

Friday
Saturday
Fold-Up Blocking Boards For Machine Knitting, Hand Knitting and Crochet
I've been asked many times about my personal preference for Blocking Boards used to block machine knit, hand knit and crochet items. I contributed the following answer to a Ravelry group discussion about Blocking Boards and I wish to share that with you now.

Blocking Boards for Knitting & Crochet Projects
My preference for blocking Knitting and Crochet projects is to use cardboard fabric cutting boards which are made for pinning out and cutting sewing patterns. These cutting boards are available at better sewing, fabric and quilting stores.
 |
 |
| All images and text ©Patrick Madden/Superba Knitting™ |
I've used these boards for decades. They are made of heavy-duty cardboard that is water resistant and have a white paper bonded to one side that is printed with colourfast measurement grids in both inches and centimetres. Opened to their full size they measure 40" wide x 72" long. Some versions are 60" long.
 |
 |
| All images and text ©Patrick Madden/Superba Knitting™ |
These Blocking Boards are tough as nails. Let me repeat that the printed paper that is bonded to the cardboard is colourfast and does not bleed the printed colour onto wet knits or crochet. People tend to be skeptical about this but it's true. I've blocked many a white, off white, cream, pale pink, blue and mauve items and never had any issue with colour bleeding.
 |
| All images and text ©Patrick Madden/Superba Knitting™ |
The cardboard does not get soggy so you can wet block directly onto the surface using either a Spray Bottle, or after having soaked and wrung out your project either by hand or using your washing machine spin cycle and also by steam blocking your knits using a home iron.
 |
 |
| All images and text ©Patrick Madden/Superba Knitting™ |
 |
| All images and text ©Patrick Madden/Superba Knitting™ |
I use these for all stages of knitwear production; blocking Gauge Swatches, piece blocking of knitting and crochet projects, and for the regular washing and drying of completed garments.
 |
| All images and text ©Patrick Madden/Superba Knitting™ |
 |
| All images and text ©Patrick Madden/Superba Knitting™ |
 |
| All images and text ©Patrick Madden/Superba Knitting™ |

As Blocking is crucial to the finishing of knitting and crochet, these boards allow for all shapes and sizes of your hand work to be blocked. I have multiples of these boards on hand so I can block a single item or group them together to accomodate much larger pieces like blankets and shawls.
 |
| All images and text ©Patrick Madden/Superba Knitting™ |
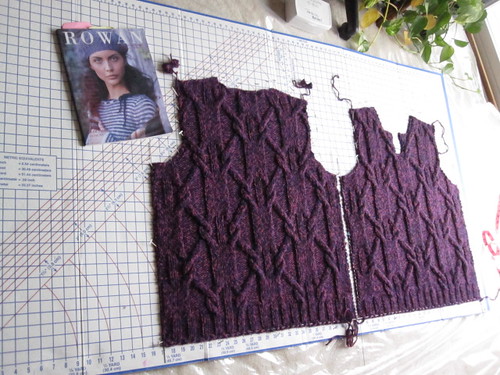
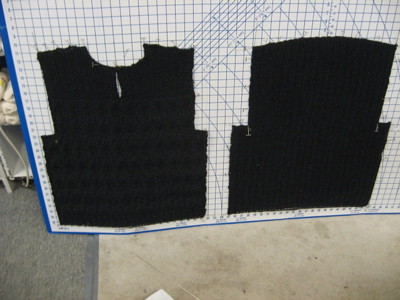
I am a tall man, 6'3" in height and I need more than one board to block a sweater my size, a minimum of two of these Blocking Boards to block personal projects and the boards are inexpensive, so I recommend you purchase two. Best to be prepared. The boards are large enough to accommodate a pullover Front and Back section, so I block those together on one board.
 |
 | |
|
 |
| All images and text ©Patrick Madden/Superba Knitting™ |
 |
| All images and text ©Patrick Madden/Superba Knitting™ |
 |
| All images and text ©Patrick Madden/Superba Knitting™ |
You do need a fairly firm surface underneath. One can lay a board on a bed and block that way but I find a mattress to still have too much movement for my liking during the pinning stage. I prefer my height-adjustable blocking table, our dining table or the living room floor. It's all about options!
 |
| All images and text ©Patrick Madden/Superba Knitting™ |
These cutting board allow you the option to dry your project with the board standing or laying on a surface. The added bonus to this is the air circulation they provide. You will find your wool and wool blends, acrylic/microfibre, silks, etc will dry very fast on their own.
 |
| All images and text ©Patrick Madden/Superba Knitting™ |
If you are working with a stubborn fabric like Cotton or Linen or a blend of these fibres, which release the moisture they've absorbed much slower, you can stand these boards outside on your deck or balcony or place one next to (but never over) a heating vent or in the same room as your home furnace. Having a household fan circulating air also helps to speed up the drying time. This is especially true in countries which have a Winter season.
 |
| All images and text ©Patrick Madden/Superba Knitting™ |
 |
 |
| All images and text ©Patrick Madden/Superba Knitting™ |
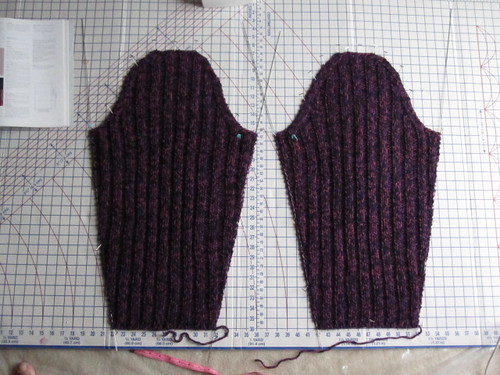
The measurement scales printed along the horizontal and vertical are in Inches and Centimetres. These, together with the grids and lines, make for fast and easy blocking and pairing of sections, IE blocking the Front and Back or two Sleeves, as you can block one piece and then quickly block it's pair next to it using the grids for reference.
 |
| All images and text ©Patrick Madden/Superba Knitting™ |
The grid markings will also help you identify visually if you have made a mistake in your knitting, IE you have knit one Cardigan front section longer than the opposite side. You may be upset to discover this mistake but this allows you to rip back and reknit this piece before you block and seam.
 |
| All images and text ©Patrick Madden/Superba Knitting™ |
 |
| All images and text ©Patrick Madden/Superba Knitting™ |
 |
| All images and text ©Patrick Madden/Superba Knitting™ |
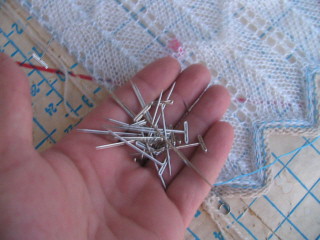
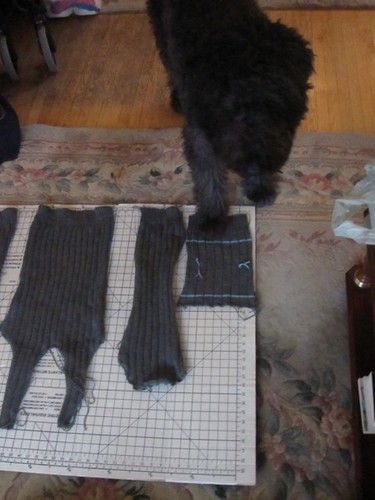
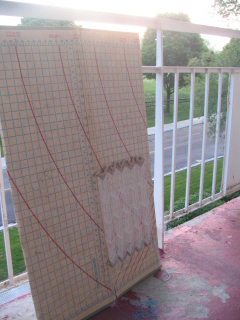
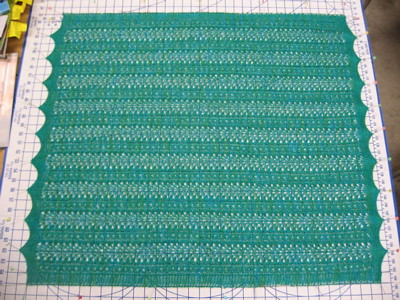
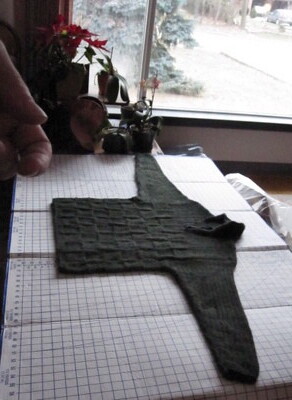
Below you can see one of my oldest cardboard cutting boards. This has to be at least 25 years old. I should retire it but some days I will block multiple items as was the case on this day the photo was taken and it still did the job.
Note the pin holes in the cardboard. Overtime these will accumulate but they don't weaken the structure of the board and while they obviously do not self-heal, they don't interfere with the blocking process.
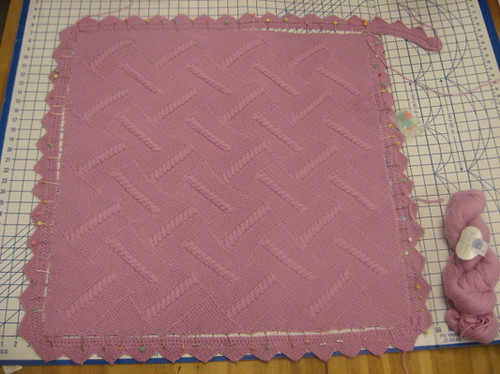
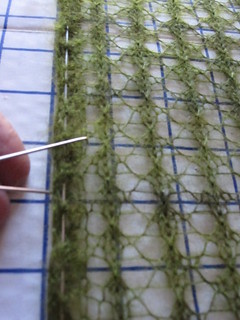
In this photo I had just pinned this hand transferred Chevron edged lace Gauge Swatch to the board and then I took the photo. What I did and what you will do during the process, and I will be demonstrating this in detail later, is using the 1"/2.5cm grid to balance out the length and width of you knitting and you can't accurately do that without a point of reference. Note that the tips of the lace Chevrons are not spaced evenly. Sometimes you have to pin, pin and repin again, adjusting the fabric both in width and length, nudging it into place to get it to be balanced. Especially with machine knits, and also very often with Lace Stitches. So this style of blocking board becomes invaluable for this reason.
 |
| All images and text ©Patrick Madden/Superba Knitting™ |
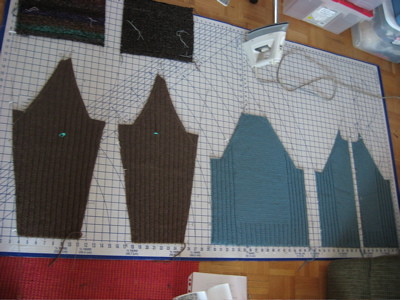
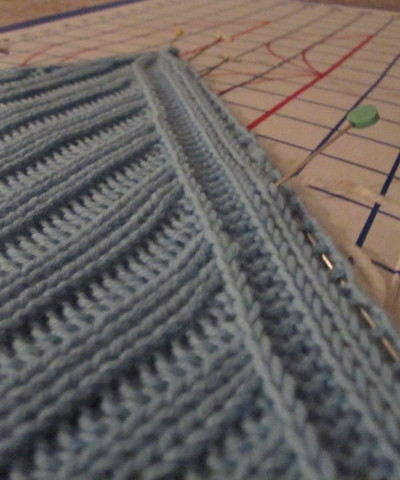
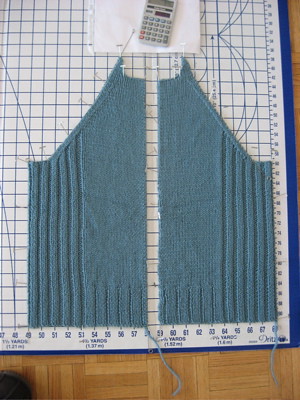
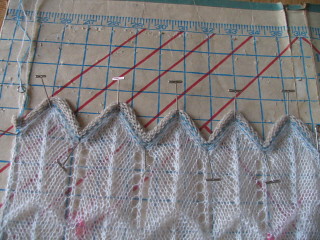
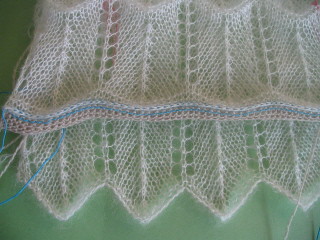
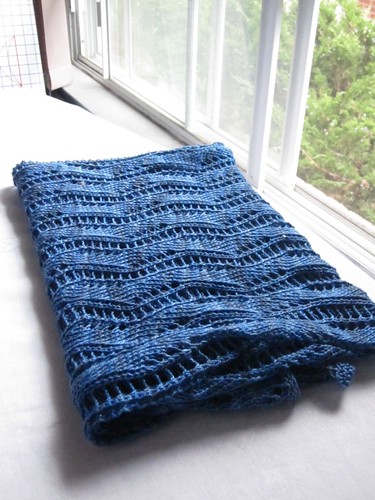
Next is the before and after photo of blocking this hand transferred lace stitch worked on my SUPERBA/WHITE 1502 double bed model knitting machine. These blocking boards made the finishing process for that project that much easier.
 |
| All images and text ©Patrick Madden/Superba Knitting™ |
You can clearly see the "before" unblocked section on the left, and on the right is the lace fabric with blocking wires inserted and pinned to the proper width and length. Once you've stretched the fabric to the proper width and pin the blocking wires along the blocking board grid lines, then you can mist the fabric or use a steam iron to set the stitches. Voila! Fast and straightforward blocking of knits.
 |
 |
| All images and text ©Patrick Madden/Superba Knitting™ |
 |
| All images and text ©Patrick Madden/Superba Knitting™ |
 |
| All images and text ©Patrick Madden/Superba Knitting™ |
I hope you find the information and point of view presented in this post helpful. Kindly remember that all images and text are copyright Patrick Madden/Superba Knitting™. All rights reserved.
Take good care and happy knitting!
Patrick Madden.
"Patrick" on Ravelry.
www.superbaknitting.com
Toronto, Ontario CANADA


Tuesday
Knitting Machine Gauge Swatch: Red Double Knitting Weight Cotton Tape Yarn in Stocking Stitch
Greetings!
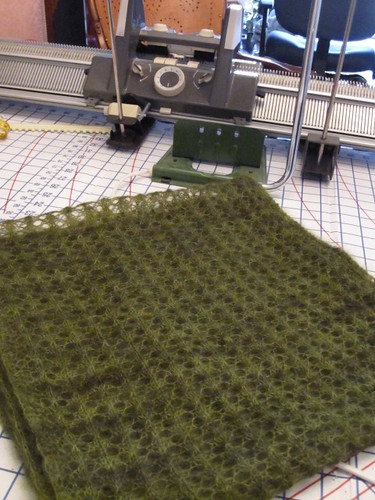
I want to share with you a Gauge Swatch I made on my SUPERBA S47 Double Bed knitting machine using a beautiful 100% Cotton Tape Yarn.
I purchased this yarn on a cone at Romni Wools here in Toronto and it is also available online through Stitch Diva Studios in California, sold as their Lucci Cotton Tape, in the Gallant Red colour.

Gauge Swatch Notes:
The format and information listed below is the one I use when making a Gauge Swatch or when sampling a new yarn or new stitch technique.
I have a dedicated notepad next to my machine at all times which has tear-away lined paper. This makes it easy to separate and then file my notes along with the washed and blocked Gauge Swatch, yarn sample and any other project information. I follow this format for hand knitting, machine knitting and crochet.

Having all this crucial information and samples together in one place serves to help you become organized and you can file this knitting information away and come back to it when you are ready to knit the garment or accessory you have in mind.
Like you I am a consumer and we are often inspired to buy a yarn based on how it looks and feels when wound onto a cone or in a ball or skein of yarn that we see and touch at our local yarn shop or that we see online.
When we get the yarn home and knit it up, this opinion can change very quickly as the yarn may not meet our expectation or we change our mind about the stitch techniques we want to use.

With all these factors influencing the final outcome of a knitted sample or Gauge Swatch, it's best to get into the habit of writing down exactly what you were doing when you knit the sample so that you have a record of all the machine settings that you made to achieve the swatch, you have information about the original yarn used, you have notes about what worked and did not work and then you will be able to quickly and accurately reproduce this swatch at a later date.
If, like me, you have a limited amount of free time to sit and knit at your machine in a given week, then this last part becomes crucial as to why it's important to make and keep detailed notes.
Let me now share with you the format and the information I recorded to achieve this Stocking Stitch Gauge Swatch using a beautiful 100% Cotton Double Knitting weight yarn.
I remind you that all images, text and format in this post are copyright Patrick Madden/Superba Knitting™ and that you do not copy nor reproduce this information. All rights reserved. Thank you for respecting that.

•1: MACHINE KNIT SWATCH NAME:
Italian Cotton DK Tape Stocking Stitch Gauge Swatch

•2. KNITTING MACHINE BRAND AND MODEL NUMBER:
SUPERBA S47 Double Bed Knitting Machine.

•3. KNITTING MACHINE GAUGE:**
• 5mm Standard Gauge.
Note: Gauge in the instance refers to the spacing of the needles on the machine bed measured in millimetres (mm).
•4: YARN INFORMATION.

• Yarn Brand Name: Italian Cotton Tape
• Yarn Weight Category: DK or Double Knitting
• Yarn Content: 100% Cotton
• Yardage: n/a for original yarn. Online a 1lb./453g cone of this same yarn has 1900 yards or 1737 metres.
• Number of Grams or Ounces: One 2lb Cone or 1.13 kg Cone.

•5. KNITTING MACHINE STITCH SIZE *NUMBER:
* PLEASE LIST A STITCH SIZE FOR EACH STITCH TECHNIQUE USED
Stocking Stitch = Stitch Size 10.


•6. KNITTING MACHINE YARN GUIDE TENSION SETTING:
Yarn Guide Tension Setting: 5

•7. KNITTING MACHINE STITCH TECHNIQUE(S) AND CARRIAGE/LOCK SETTINGS:
Please list in order all the knitting machine Stitch Techniques and the Carriage/Lock Setting for your model of knitting machine to achieve these stitches.
Stocking Stitch, worked on the Back Needle Bed.
Back Bed Carriage Settings:
• V Stitch Key selected for Stocking Stitch
• Needle Return Buttons set to neutral setting "•".
• Stitch Size Dial: 10

• Front Needle Bed Position: Flow Combs Set Opposite

• Front Bed Racking Position Set To 4.5

• Bed Space Lever Set To 4

• Gauge Swatch worked over 70 Stitches (35L-0-35R).

• I cast on using the Waste Yarn + Ravel Cord Provisional Cast On Technique then worked a Long Tail or Double e-Wrap Cast On Technique using the Cotton Tape yarn.


• I used a Medium length 100 Stitch Cast On Comb and 3 Medium Superba Weights.


• I also used two Claw Weights on the edge stitches. Yes, these are the ones that came with my japanese SINGER knitting machine. The Knitting Police don't mind!

• 8.: SWATCH GAUGE: Very important!
Stitch and Row Gauge: the average number of Stitches and Rows one achieves in your finished knit fabric measured over an industry standard of 4" square or 10cm square.
• Gauge Swatch After Washing/Drying:
23 Stitches x 36 Rows


• How was the Gauge Swatch cleaned?
The Gauge of this particular swatch was achieved after washing the swatch in a regular cycle, cold wash using a top loading washing machine. The swatch was then put in the dryer along with a load of regular laundry using the permanent press cycle until completely dry.
This is how the finished garment will be cleaned, this is how you treat the Gauge Swatch.
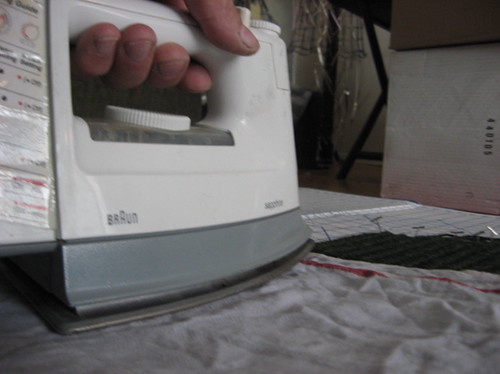
The Gauge Swatch was then blocked to shape using blocking wires and steamed using the Cotton setting on my standard household iron.

•9. ADDITIONAL KNITTING MACHINE SWATCH NOTES:
While I would have preferred a slightly tighter tension, the recipient did not want the resulting hand of the fabric to be too coarse to the touch nor too tight as to overheat when wearing, so she chose this gauge. It feels really nice and it’s a beautiful red and the finished Cardigan has been worn and laundered numerous times and holds up extremely well to food and beverage stains and being laundered.
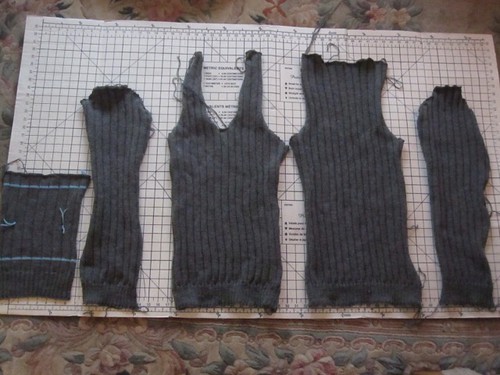
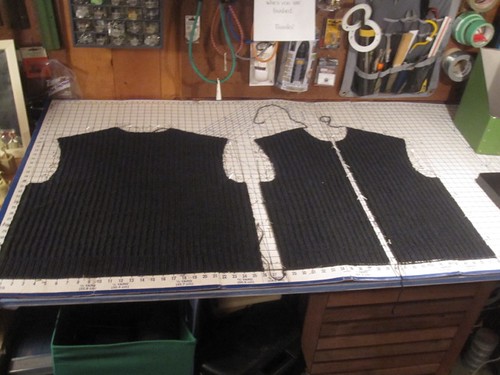
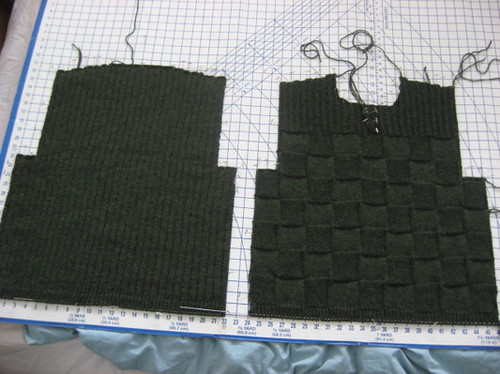
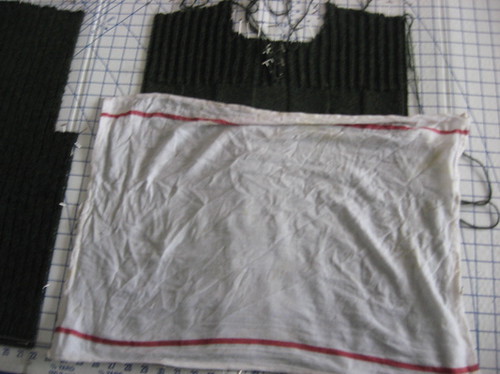
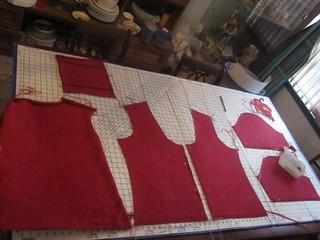
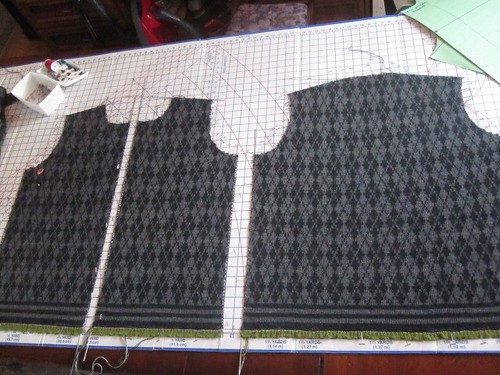
Here are two photos of my washed and blocked Gauge Swatch in action during the blocking of the Garment this swatch was used to calculate. It is very important to have your Gauge Swatch on hand for comparison, especially when blocking. It's good to compare the fabric and stitch size of the swatch to that of your garment pieces and it's crucial to a successful garment.
Always make a Gauge Swatch. Always. Anyone who advises you otherwise is misleading you and your project will not turn out as desired.


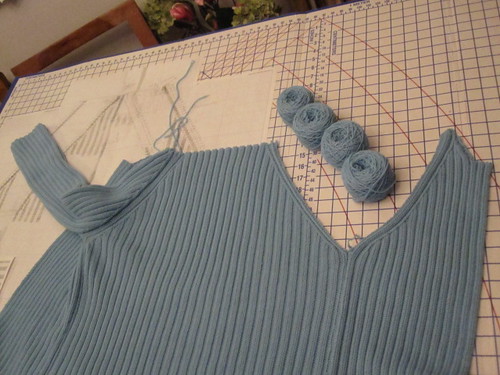
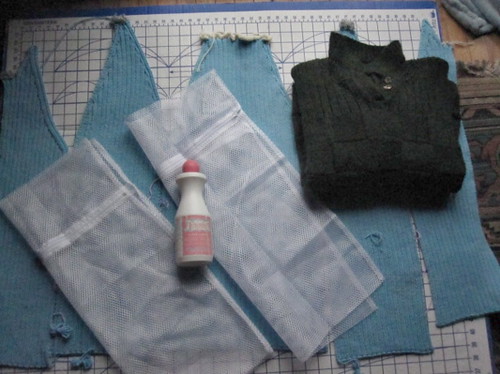
Lastly, here is a photo of the completed garment that this Gauge Swatch was used to create, worn by my knitting pal and good friend Liz. This pattern was made to her size and specifications regarding Sleeve Length, Neckline Depth and Design Ease. I think it turned out well and most importantly, she does!


______________________________________________________________________
Machine Knitting Swatch Database Group on Ravelry.com
If you are a member of the excellent online knitting website Ravelry, I invite you to join the Machine Knitting Swatch Database group that I moderate and contribute your own Gauge Swatch information to share with other knitters from around the world.

This group is for home knitting machine brands of all makes and models. This information will serve to help promote machine knitting and also to help establish and build a free database of knitting machine information. Join us!
______________________________________________________________________
I hope you found the information and photos presented today helpful. I encourage you to get organized, set aside some time in your busy day to at the very least sample and make a record of your work and use this information to prepare to make something on your Superba, Singer, White or Phildar french knitting machine.
I wish you happy knitting.
Patrick Madden
Superba Knitting
Toronto, Ontario CANADA


I want to share with you a Gauge Swatch I made on my SUPERBA S47 Double Bed knitting machine using a beautiful 100% Cotton Tape Yarn.
I purchased this yarn on a cone at Romni Wools here in Toronto and it is also available online through Stitch Diva Studios in California, sold as their Lucci Cotton Tape, in the Gallant Red colour.

Gauge Swatch Notes:
The format and information listed below is the one I use when making a Gauge Swatch or when sampling a new yarn or new stitch technique.
I have a dedicated notepad next to my machine at all times which has tear-away lined paper. This makes it easy to separate and then file my notes along with the washed and blocked Gauge Swatch, yarn sample and any other project information. I follow this format for hand knitting, machine knitting and crochet.

Having all this crucial information and samples together in one place serves to help you become organized and you can file this knitting information away and come back to it when you are ready to knit the garment or accessory you have in mind.
Like you I am a consumer and we are often inspired to buy a yarn based on how it looks and feels when wound onto a cone or in a ball or skein of yarn that we see and touch at our local yarn shop or that we see online.
When we get the yarn home and knit it up, this opinion can change very quickly as the yarn may not meet our expectation or we change our mind about the stitch techniques we want to use.

With all these factors influencing the final outcome of a knitted sample or Gauge Swatch, it's best to get into the habit of writing down exactly what you were doing when you knit the sample so that you have a record of all the machine settings that you made to achieve the swatch, you have information about the original yarn used, you have notes about what worked and did not work and then you will be able to quickly and accurately reproduce this swatch at a later date.
If, like me, you have a limited amount of free time to sit and knit at your machine in a given week, then this last part becomes crucial as to why it's important to make and keep detailed notes.
Let me now share with you the format and the information I recorded to achieve this Stocking Stitch Gauge Swatch using a beautiful 100% Cotton Double Knitting weight yarn.
I remind you that all images, text and format in this post are copyright Patrick Madden/Superba Knitting™ and that you do not copy nor reproduce this information. All rights reserved. Thank you for respecting that.

Red Italian Cotton Tape DK Yarn
Gauge Swatch in Stocking Stitch.
•1: MACHINE KNIT SWATCH NAME:
Italian Cotton DK Tape Stocking Stitch Gauge Swatch

•2. KNITTING MACHINE BRAND AND MODEL NUMBER:
SUPERBA S47 Double Bed Knitting Machine.

 |
| All images and text copyright Patrick Madden/Superba Knitting™. All rights reserved. © |
•3. KNITTING MACHINE GAUGE:**
• 5mm Standard Gauge.
Note: Gauge in the instance refers to the spacing of the needles on the machine bed measured in millimetres (mm).
•4: YARN INFORMATION.

• Yarn Weight Category: DK or Double Knitting
• Yarn Content: 100% Cotton
• Yardage: n/a for original yarn. Online a 1lb./453g cone of this same yarn has 1900 yards or 1737 metres.
• Number of Grams or Ounces: One 2lb Cone or 1.13 kg Cone.

•5. KNITTING MACHINE STITCH SIZE *NUMBER:
* PLEASE LIST A STITCH SIZE FOR EACH STITCH TECHNIQUE USED
Stocking Stitch = Stitch Size 10.


•6. KNITTING MACHINE YARN GUIDE TENSION SETTING:
Yarn Guide Tension Setting: 5

•7. KNITTING MACHINE STITCH TECHNIQUE(S) AND CARRIAGE/LOCK SETTINGS:
Please list in order all the knitting machine Stitch Techniques and the Carriage/Lock Setting for your model of knitting machine to achieve these stitches.
Stocking Stitch, worked on the Back Needle Bed.
Back Bed Carriage Settings:
• V Stitch Key selected for Stocking Stitch
• Needle Return Buttons set to neutral setting "•".
• Stitch Size Dial: 10

• Front Needle Bed Position: Flow Combs Set Opposite

• Front Bed Racking Position Set To 4.5

• Bed Space Lever Set To 4

• Gauge Swatch worked over 70 Stitches (35L-0-35R).

• I cast on using the Waste Yarn + Ravel Cord Provisional Cast On Technique then worked a Long Tail or Double e-Wrap Cast On Technique using the Cotton Tape yarn.


• I used a Medium length 100 Stitch Cast On Comb and 3 Medium Superba Weights.


• I also used two Claw Weights on the edge stitches. Yes, these are the ones that came with my japanese SINGER knitting machine. The Knitting Police don't mind!

• 8.: SWATCH GAUGE: Very important!
Stitch and Row Gauge: the average number of Stitches and Rows one achieves in your finished knit fabric measured over an industry standard of 4" square or 10cm square.
• Gauge Swatch After Washing/Drying:
23 Stitches x 36 Rows


• How was the Gauge Swatch cleaned?
The Gauge of this particular swatch was achieved after washing the swatch in a regular cycle, cold wash using a top loading washing machine. The swatch was then put in the dryer along with a load of regular laundry using the permanent press cycle until completely dry.
This is how the finished garment will be cleaned, this is how you treat the Gauge Swatch.
The Gauge Swatch was then blocked to shape using blocking wires and steamed using the Cotton setting on my standard household iron.

•9. ADDITIONAL KNITTING MACHINE SWATCH NOTES:
While I would have preferred a slightly tighter tension, the recipient did not want the resulting hand of the fabric to be too coarse to the touch nor too tight as to overheat when wearing, so she chose this gauge. It feels really nice and it’s a beautiful red and the finished Cardigan has been worn and laundered numerous times and holds up extremely well to food and beverage stains and being laundered.
 |
| All images and text copyright Patrick Madden/Superba Knitting™. All rights reserved. © |
Always make a Gauge Swatch. Always. Anyone who advises you otherwise is misleading you and your project will not turn out as desired.

Lastly, here is a photo of the completed garment that this Gauge Swatch was used to create, worn by my knitting pal and good friend Liz. This pattern was made to her size and specifications regarding Sleeve Length, Neckline Depth and Design Ease. I think it turned out well and most importantly, she does!


______________________________________________________________________
Machine Knitting Swatch Database Group on Ravelry.com
If you are a member of the excellent online knitting website Ravelry, I invite you to join the Machine Knitting Swatch Database group that I moderate and contribute your own Gauge Swatch information to share with other knitters from around the world.

This group is for home knitting machine brands of all makes and models. This information will serve to help promote machine knitting and also to help establish and build a free database of knitting machine information. Join us!
______________________________________________________________________
I hope you found the information and photos presented today helpful. I encourage you to get organized, set aside some time in your busy day to at the very least sample and make a record of your work and use this information to prepare to make something on your Superba, Singer, White or Phildar french knitting machine.
I wish you happy knitting.
Patrick Madden
Superba Knitting
Toronto, Ontario CANADA


Subscribe to:
Posts (Atom)