

Greetings,
In this post I provide an overview of the most common Methods and Techniques used to establish stitches on a home knitting machine.
The english knitting term for this process is Casting On.
The english knitting term for this process is Casting On.

While this information blog deals exclusively with the french knitting machine brand names SUPERBA, SINGER, WHITE and PHILDAR, the methods and techniques I am reviewing can be applied to any brand of home knitting machine.

__________________________________________________
Please Note:
This is a general overview of Cast On Methods and Techniques.
At a later date I will add links to each Cast On description which will take you to photo and video tutorials demonstrating how to work these on your knitting machine.
This is a general overview of Cast On Methods and Techniques.
At a later date I will add links to each Cast On description which will take you to photo and video tutorials demonstrating how to work these on your knitting machine.
This will allow you to experiment and practice these techniques on your machine at home, and to also compare my instructions to other ways demonstrated online by other machine knitting instructors and publications. Check back often for the links as I add them.

__________________________________________________
CAST ON METHODS & TECHNIQUES
Before I explain the specific steps of how to Cast On, let me review Cast On Methods for machine knitting in general.
WHY? Many of you reading this may have come to machine knitting from hand knitting and you are already familiar with the term Casting On but you might not recognize the names of specific Cast On techniques; what these look like or their purpose. It may be that you have only ever used one way of Casting On all your life.
You may be aware that there is more than one way to Cast On stitches on your machine but you're not sure of the benefits of other techniques or how you would begin to apply these to machine knitting.

For a large majority of you, this may be the first time you have been exposed to the learning curve and technical language of machine knitting. You're new to knitting in general. You have no previous knitting experience of any kind and a new machine in your possession. You may have tried to knit a few samples on your knitting machine but with mixed results and this can be disappointing and frustrating, when you all you want is for this marvellous machine to knit!
 |
e-Wrap Closed Cast On Technique ©Superba Knitting™ |
Part of the learning curve of machine knitting is you have to learn the language; not only of hand movements and processes, but also of the corresponding parts on your knitting machine which are involved in the process of Casting On.
__________________________________________________
It's OK To Ask For Assistance!
Always ask for clarification of terms or instructions.
If you are not understanding a step or process, feel free to email me or join the wonderful discussion groups for machine knitter's on Ravelry.com - the best online community and database for all knitters from all over the world.
Remember that there are no silly questions. Too often machine knitters, in handing out advice, assume that everyone is aware of the meaning of various techniques and how they are performed. In giving advice, more advanced or experienced knitters can forget what it is like to be starting out new and encountering the steep learning curve that comes with operating a home knitting machine.
So ask questions. Please don't be shy.
__________________________________________________

I'll start by explaining the difference between what we call an Open Cast On Edge and a Closed Cast On Edge, and then I'll review the four most popular Cast On "Techniques" used in knitting.
Lastly, I'll show you how you can combine the features and versatility of both of these methods by working the Waste Yarn + Ravel Cord Cast On, which is my personal favourite way of Casting On stitches on a home knitting machine.
NOTE: Many knitting terms in the english language have their origin in Maritime cultures, particularly those of England, which influenced the names for various knitting stitches and also techniques; this includes the term "Casting On" - as in to cast your net or line when fishing! For those of you in non-English speaking countries, I hope your translation software will be able to translate these terms. Don't hesitate to email me if you require clarification.
__________________________________________________
 |
©Patrick Madden/Superba Knitting™ |
Cast On Methods
There are three basic Cast On 'Methods' used in Machine Knitting:
1. The Open Cast On.
2. The Closed Cast On.
3. The Provisional Cast On aka The Waste Yarn & Ravel Cord Cast On.
Let me explain these.
THE OPEN CAST ON
The OPEN CAST ON is used in machine knitting to quickly establish stitches on your knitting machine for the purpose of:
• Sampling a new yarn.
• Sampling a stitch technique or stitch pattern.
• Creating a Provisional Cast On Edge to your fabric.

NOTE: The bottom edge of an Open Cast On is just as the name describes; it is open! The stitches along this foundation edge are not closed and therefore this edge will unravel or come undone.
An Open Cast On is not meant for the "finished" edge of a garment or accessory or a Gauge Swatch. It is purely temporary.
An Open Cast On is not meant for the "finished" edge of a garment or accessory or a Gauge Swatch. It is purely temporary.

DETERMINING STITCH SIZE
In the beginning stages of machine knitting, as you may already be aware of, you need to experiment and learn the Stich Size Settings of your particular model of knitting machine and the suitable weights of yarns to begin learning to knit with.
We are spoiled in this day and age for choices of what kind of yarn we can work with when knitting but you have to remember that our knitting machines do have their limitations as to what thickness of yarn they are designed to knit with using every needle.
Learning Curve Alert! It is up to you, the knitter, to explore and figure out what your preference is for yarn thickness when it comes to making garments and then you have to experiment and learn how to set your knitting machine to make the resulting knit fabric turn out the way you prefer.
A SUPERBA Double Bed model knitting machine can knit the widest range of yarn weights for a single gauge of home knitting machine and you need to explore and finesse how to achieve success in working with such a wide variety of yarn thicknesses and fibres.
YARN SUGGESTIONS FOR PRACTICING:
For new knitters, I suggest purchasing either 4 Ply Sock Yarn or 4 Ply Baby Yarn to begin practicing with. Brand names to look for are Berroco Sox, Regia 4 Ply, Patons Kroy, Lang Jawool, or Sirdar Snuggly 4 Ply Baby Yarn. All of these will work up quite nicely in Stocking Stitch using Stitch Size 7 or 8. For Ribbing try Stitch Size 5 or 6. Your choice!

TIP!! Even though you will gain experience over time of working with a variety of yarn weights, each time you choose a new project to work on and a new yarn to knit with, you must sit at your machine and work up a few small samples of different Stitch Size settings to determine the best setting number to knit this new yarn at.

The Open Cast On Method allows you to quickly establish stitches on your knitting machine without investing the time forming a Closed Cast On edge by hand.

That's the benefit: it's a time saver.

Later on, when you work the larger finished Gauge Swatch, which you will wash, dry and use for calculating shapes and garment sizes, you can devote time to creating a finished, Closed Cast On edge. For a new yarn or working a new stitch technique, you need a reference point to start with in setting your machine. Please recognize the importance of Stitch Size.
STITCH SIZE & YARN
When you bring home a new yarn you first want to experiment by knitting a small sample swatch, so you can see and feel how a yarn knits up. It is only by experimenting with the various stitch size settings that you can achieve the look and feel to the knit fabric that you want.
VERY IMPORTANT: This is how you learn to match the stated "Gauge" of so many rows and stitches per inch, in a hand knitting pattern.

If you want to be able to adapt a published knitting pattern on your home knitting machine, you have to match the stated Gauge of that pattern. If you have no reference point of how to set your machine to knit a particular yarn thickness, you won't get very far in making a project.

There is no hard and fast rule about this but you will develop an understanding of the yarn weight classification system that is now used more and more throughout the world, and you will gain knowledge of what Stitch Size setting to start sampling certain yarns at. But this only comes through sampling.

THE STITCH SIZE DIAL
The Stitch Size Dial on a SUPERBA Knitting Machine and the setting numbers are similar to experimenting with various needle sizes in hand knitting or adjusting the stitch length dial on a sewing machine.
The higher the Stitch Size number, the larger and longer the stitches will be formed. This adjustment is immediate, change the setting number and the cams on the bottom of the Carriages will form longer or shorter stitches.

This is also true of the Auto Tension Dial located on the Yarn Tension Guide, which your yarn is threaded through.

Very Important: These two dials control the "tension" on the yarn as it is worked through your machine and effect the final number of Stitches and Rows per inch, which is known as Gauge.

USING THE OPEN CAST ON METHOD
Let me show you a few examples of how I have worked the Open Cast On in my own knitting projects.
In these next photos I worked a small sample swatch using "Sensation" yarn, which is an Anogra/Wool blend produced by Naturally of New Zealand.
I worked my sample using Stocking Stitch, which is the basic stitch a home knitting machine can work and I experimented with two different Stitch Sizes: 11 + 12.

I did not choose these setting numbers arbitrarily, I had the knowledge that this thickness of yarn - which is classified as a Worsted Weigh Hand Knitting Yarn - was pushing the upper limits of how thick a yarn the machine is capable of knitting. So I wanted to experiment and compare the knitted fabric worked on the two higher setting numbers: 11 and 12.


All I am concerned with in the beginning is what Stitch Size to set my machine at to be able to knit a particular yarn. By working the Open Cast On Method the process and results are immediate as you don't have to spend time creating a closed, finished edge, which is more time consuming.

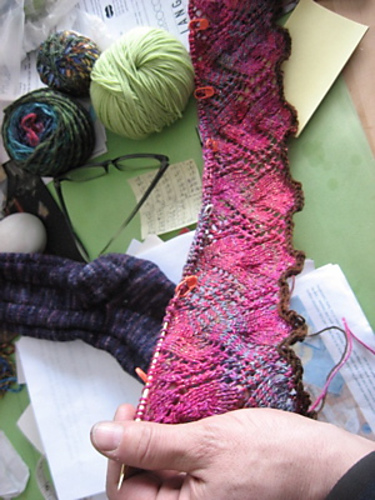
In this next photo I am sampling on the machine with Madil "Kid Seta" which is a Lace Weight Mohair. Mohair yarns like to "bloom" and fluff up and each stitch needs extra room around it to allow this to happen or the resulting fabric, if knit too tight, will look matted, like a dog in need of a good brushing!
So at first I knit a few rows at Stitch Size 5 and recognized that the stitches were on the small side, so I increased the Stitch Size to no.8 - you can clearly see the difference in the size of the stitches. I ended up choosing Stitch Size 10 for this Silk/Mohair yarn as this yarn needs some space around the stitches for the mohair fibres to "bloom" or puff up when washed and setting no. 8 was still too small.

Next is some sock yarn I was sampling and you can see the variation in the length and size of stitches you can achieve. Now some projects, like Socks, require that you create a very dense knit fabric to make the end product hard wearing. For a shawl or a sweater, you may wish to have an open, soft knit fabric with lots of drape. To learn how to achieve these different effects, you have to practice and sample.

So remember that one of the quickest way to Cast On is to work an Open Cast On.

Upon closer inspection of the Open Cast On edge, you can clearly see the individual "Open" stitches formed around the teeth of the Cast On Comb.
 |
| Open Cast On Foundation Row Of Stitches / ©Superba Knitting |

Both the bottom and top edges will be "open" and can unravel, but that's OK. This sample is temporary. This "open" method of Casting On is simply to determine Stitch Size, a starting point, if you will.

After you sample your new yarn and determine the best Stitch Size for the yarn, you can always unravel this sample swatch, rewind the yarn and then work a finished, larger size of swatch using a CLOSED CAST ON METHOD.
WASTE NOT: This is an important consideration, especially in today's knitting market, where we have a fantastic choice of beautiful hand knitting yarns like never before.


The Open Cast On Method allows us the opportunity to quickly sample a yarn, then rip back (undo) our knitting without too much damage to the yarn. There will be some crimp to the fibres, but not to the degree as if it was steamed or blocked.
WASTE NOT: This is an important consideration, especially in today's knitting market, where we have a fantastic choice of beautiful hand knitting yarns like never before.

This includes hand dyed yarns and yarns that are now commonly put up skeins, shown above and below. While we should always buy enough yarn to be able to knit a Gauge Swatch, which we use for calculating garment shapes, sometimes there is precious little yarn left to be able to sample and experiment with.

The only recourse is to buy another full skein but some yarns are very expensive and at $30+ each, this can make or break the decision buy a sweater lot or to be stuck with 200+ extra yards of a yarn you'll never knit with again. You don't always have the money to be able afford extra yarn and so you have to compromise.

The Open Cast On Method allows us the opportunity to quickly sample a yarn, then rip back (undo) our knitting without too much damage to the yarn. There will be some crimp to the fibres, but not to the degree as if it was steamed or blocked.
 |
Sample Swatch Unraveled. ©Superba Knitting |
__________________________________________________
• THE CLOSED CAST ON
• THE CLOSED CAST ON
The Closed Cast On Method in knitting creates a finished edge to your knit fabric that will not unravel.

The Closed Cast On Method in knitting is comprised of various "Cast On Techniques" - each suited to certain stitch techniques and knitting projects.
WHEN TO USE A CLOSED CAST ON?
The Closed Cast On is worked along the edges of sweaters, cardigans and blankets. Anything with an edge.
 |
Long Tail Cast On For 2x2 Ribbing / © Superba Knitting |
The Closed Cast On "techniques" you choose to work for a particular project are determined mainly by the kind of knit fabric you wish to make.
 |
Long Tail Purl Ridge Cast On / ©Patrick Madden - Superba Knitting™ |
Some Closed Cast On Techniques provide a very firm, durable edge suitable for hard wearing sweaters, cardigan and coats....
While other Closed Cast On Techniques provide durability but also are flexible to allow stitch techniques, like Lace Stitches, to be blocked to a larger size and a defined shape.
 |
| Tubular Cast On Technique No.2 For 2x2 Rib in Silk/Cotton |
While other Closed Cast On Techniques provide durability but also are flexible to allow stitch techniques, like Lace Stitches, to be blocked to a larger size and a defined shape.


Note: This consideration is very important if you own a 5mm Gauge model of SUPERBA Knitting Machine, as these knitting machines can work the widest range of yarn weights compared to any other standard gauge brand of home knitting machine. This includes Silver Reed, Brother and Passap.
 |
WHITE Model 1502 Knitting Machine / © Superba Knitting |
Therefore, as you vary the fibre content of your project yarn and you increase the thickness of the yarn that you knit on your machine, the yarn + the stitch technique + the look + the drape of the final product will all determine which CAST ON TECHNIQUE you use.
 |
| A Long Tail Cast On For 2x2 Rib Using Berroco Ultra Alpaca Yarn / ©Superba Knitting |
How does one learn all this? You sample and experiment.
 |
| "Tiur" Wool/Mohair Yarn Cable + 2x2 Rib Stitches With Long Tail Cast On / © Superba Knitting |
Note: Much of this comes down to personal preference. There are some knitters who only use one Cast On technique, one shaping method and one Cast Off technique. Great. Fine. But I encourage you to expand your basic knowledge and to test these various techniques out as you explore and learn your machine. That way you develop an informed opinion vs. just taking someone else's word as the way to do things.
CLOSED CAST-ON TECHNIQUES
In machine knitting, as with hand knitting, there are four (4) commonly used Closed Cast On Techniques for establishing both Single Bed and Double Bed stitches on our machines:
• The e-Wrap Cast On
• The Long Tail Cast On
• The Crochet Cast On
• The Tubular Cast On

Let me briefly review each of these.
• The e-Wrap Cast On Technique
This is favoured for it's elasticity and the low-profile edge it creates to knit fabrics.
 |
e-Wrap Cast On Technique / © Superba Knitting |
This creates a very simple and elegant edge to knit fabrics and you will see this used often for Baby clothes and Lace Projects. This is the same technique as the "Thumb" method used by Hand Knitters.
The e-Wrap technique gets it's name from the way one wraps each needle with the yarn, as if one were drawing a cursive "e" when writing. This is a very simple and easy to learn cast on technique.
 |
e-Wrap Cast On Technique / © Superba Knitting |
• The Long Tail Cast On Technique aka Double e-Wrap.

Many machine knitters reading this will know this technique as the Double e-Wrap.
 |
Long Tail Cast On Technique / © Superba Knitting |
This is worked like the simpler e-Wrap Technique, but has the extra step of wrapping the yarn around a needle and then returning to the previously wrapped stitch and knitting this through. What this does is automatically creates a row of knit stitches which produces two distinct effects to each side of the Cast On edge:
The Long Tail Cast On: Knit Side
There is a defined "Knit Side" which produces edge stitches which slant at an angle along the edge of the fabric.

The Long Tail Cast On: Purl Side
The opposite side produces what look like Purl Stitches or purl bumps along the finished cast on edge. Personal preference applies here as to which side you want facing on the right side or public side of your project.

I used the Purl Side of the Long Tail Cast On for the edge of the socks I knit, below.

The Long Tail Cast On is highly favoured by sock knitters and for garment edges because of it's elasticity and low-profile edge.

The Long-Tail Cast On provides a beautiful alternative to the commonly used Tubular Cast On technique, especially when working Rib Stitches.
Definitely one of my favourite ways to cast on stitches. I use the Long Tail more than any other Cast On technique for both Hand Knitting and Machine Knitting. Why?
The Long Tail Cast On looks so nice in so many yarns, lays flat, is not bulky and gives a nice defined edge to your work, be it Stocking Stitch, Ribbing or Lace. But that's my opinion! Explore and develop your own preferences.
Tip: The Long Tail Cast On is easily worked on either the Back Bed or the Front Needle Bed on a SUPERBA Double Bed Knitting Machine. This is an important feature, especially when you have to Cast On for items worked in the round, such as Socks.
TIP - Compare + Evaluate: I want to show you that not all Cast On Techniques work for all yarns. The Long Tail Cast On not withstanding. Here I have worked this technique using 'Cruise' by Classic Elite Yarns. This is a gorgeous blend of 70% Silk + 30% Cotton.


I tried the Long Tail technique but due to the numerous plies of the yarn, which, due to the nature of the fibres, are on the stringy side, the Long Tail produced a rather loose, limp and sloppy edge to my knitting.

For comparison, I worked the same yarn in a Tubular Cast On, which produced a much more satisfactory edge for this style of yarn and the one I ended up using for the sweater.

The Long-Tail Cast On provides a beautiful alternative to the commonly used Tubular Cast On technique, especially when working Rib Stitches.
 | ||
Long Tail Cast On Worked In Sock Yarn Relaxed / ©Superba Knitting
|

 |
| Long Tail Cast On + Fisherman's Rib In 'Muse' by Stacy Charles. |
 |
Long Tail Cast On Technique / © Superba Knitting |
 |
| Long Tail Cast On Worked On The Front Needle Bed / ©Superba Knitting |
TIP - Compare + Evaluate: I want to show you that not all Cast On Techniques work for all yarns. The Long Tail Cast On not withstanding. Here I have worked this technique using 'Cruise' by Classic Elite Yarns. This is a gorgeous blend of 70% Silk + 30% Cotton.


I tried the Long Tail technique but due to the numerous plies of the yarn, which, due to the nature of the fibres, are on the stringy side, the Long Tail produced a rather loose, limp and sloppy edge to my knitting.


So it pays to sample and compare techniques!

• The Crochet Cast On Technique
Favoured for it's firm, durable edge with a distinctive chain stitch running horizontally along the edge of the knit fabric, the Crochet Cast On technique is used by both Hand and Machine knitters for Blankets, Afghans, along the edge of Cuffs and Hems for children, teens and work wear sweaters.

Also, the Crochet Cast On has a matching Cast Off technique which is very easy to work on a home knitting machine.
This is critical for garments worked sideways, like a Jacket, Cardigan or Blanket, as you want the edges of the Jacket opening to look the same on both sides or the beginning and end of a Blanket or Afghan to be finished identically.
 |
| Crochet Cast On Technique / © Superba Knitting™ |
The Crochet Cast On is formed using the Latch Hook Tool which comes with your knitting machine. It is formed over the shaft of the needles with the working yarn. It takes practice to achieve a consistent, balanced look to these edge stitches but once learned, it is also one of the faster Closed Cast On techniques you can work.

• The Tubular Cast On Technique
This is a Cast On technique highly favoured by both hand and machine knitters. It is a closed cast on technique created by forming a small tube of stitches or a tiny folded hem if you will, along the edge of the fabric.

When done properly, this Cast On technique produces a beautifully rounded edge to your knit fabric which provides durability, elasticity and for machine knitters, this often will match the thickness of certain Double Bed stitch techniques.

Machine knitters who have Double Bed model machines or brands that use a Ribber attachment learn this cast on technique immediately. It is very easy to execute and is adaptable to K1 P1 rib, K2 P2 rib and a host of both Double Bed and Single Bed stitch techniques.

 |
| Tubular Cast On Edging 2x2 Ribbing / ©Superba Knitting |

Hems, like the popular Folded Hem and Picot Hem are all derived from the Tubular Cast On technique. These are just variations on this technique. But we'll leave the topic of Hems for another day!
__________________________________________________
• Provisional Cast On Method aka
The Waste Yarn + Ravel Cord Cast On.

It prevents loose, distorted edge stitches in your knitting.
Learning Curve Alert!
Please understand the following:
If you follow the instruction manual that came with your SUPERBA, SINGER, WHITE or PHILDAR knitting machine, the first Cast On technique you read advises you to cast on your initial row of stitches directly around the teeth of a Cast On Comb or with the Comb sitting just behind the stitches.


Learning Curve Alert!


Note: You can clearly see the Waste Yarn & Ravel Cord at the back of the needles in these two photos. You work the Closed Cast On Technique of your choice directly over the row of Ravel Cord Stitches.
The Ravel Cord is fine enough that it does not distort the edge of your knitting and it's smooth enough that it will not get tangled and is easily removed when this Cast On Method is done.


Look at the photo above: observe the Ravel Cord Stitches and the foundation row of your Closed Cast On knitting through perfectly fine on this first row. Your SUPERBA can easily handle this method up to using some light Worsted Weight yarns.


I hope you have found this review of Cast On Methods and Techniques informative.
Reminder: I will post separate, expanded tutorials for each of the Closed Cast On Techniques I covered in this post, including instructions for starting with Waste Yarn + Ravel Cord.
Do go ahead and try working these on your own. You may be able to glean enough information from the photos I've shown you and of course, by watching all the instructional videos available on YouTube. But try them by working the Waste Yarn & Ravel Cord Method first!
Take good care and happy knitting.
Patrick Madden.
www.superbaknitting.com
Learning Curve Alert!
• Provisional Cast On Method aka
The Waste Yarn + Ravel Cord Cast On.
The final Cast On method one sees on a regular basis in both hand knitting and machine knitting is called the Provisional Cast On.

A Provisional Cast On is a temporary cast on method worked in hand knitting and is very popular for Lace Shawls and for Jackets. The Provisional method generally begins with a row of Single Crochet or chain stitches in a contrasting yarn, which will be removed later in the knitting process. This section of starter yarn is also known as "Waste Yarn". Why?

What this allows one to do is, after having completed the first section, say the centre of a shawl, you can come back to this provisional edge and easily pick up your Main Yarn stitches with your knitting needle, as they stand out in relation to the contrast yarn. You then remove and dispose of the Waste Yarn.

With these open edge stitches on your needles, you can continue knitting, often working and attaching a lace border to this edge as you work. This provisional method is how one works a jacket sideways, starting at the centre back, and it is one way of working a folded hem or a neckband that will be backstitched in place.

With these open edge stitches on your needles, you can continue knitting, often working and attaching a lace border to this edge as you work. This provisional method is how one works a jacket sideways, starting at the centre back, and it is one way of working a folded hem or a neckband that will be backstitched in place.
With machine knitting we utilize a unique version of the Provisional Cast On which combines the features of the both the Open and Closed Cast On Methods:
• The Waste Yarn & Ravel Cord Cast On Method.

• The Waste Yarn & Ravel Cord Cast On Method.

This is my preferred method for starting all my machine knitting projects - be it a sweater, a lace shawl, a blanket or a pair of socks. Why?
It prevents loose, distorted edge stitches in your knitting.
Learning Curve Alert!
Please understand the following:
If you follow the instruction manual that came with your SUPERBA, SINGER, WHITE or PHILDAR knitting machine, the first Cast On technique you read advises you to cast on your initial row of stitches directly around the teeth of a Cast On Comb or with the Comb sitting just behind the stitches.
 |
©Patrick Madden/Superba Knitting™ |
Now this is fine if you are sampling a yarn and you want a closed edge to this sample, as you will want to keep it as a record for your files.
But for the finished edge on a garment or accessory, the size and distance of the metal Cast On Comb "teeth" from the needles can create a larger, looser row of stitches along the edge of your knitted fabric. You don't want that. Why?
 |
e-Wrap Closed Cast On Worked Over The Cast On Comb. |
But for the finished edge on a garment or accessory, the size and distance of the metal Cast On Comb "teeth" from the needles can create a larger, looser row of stitches along the edge of your knitted fabric. You don't want that. Why?
 |
©Patrick Madden/Superba Knitting™ |
This may cause the finished edge to ripple and be wavy. And it drives a lot of machine knitters crazy! I read about this frustration all the time, especially for people working the Tubular Cast On technique involving ribbed stitches.
 |
Closed Cast On Formed Directly On Cast On Comb. |
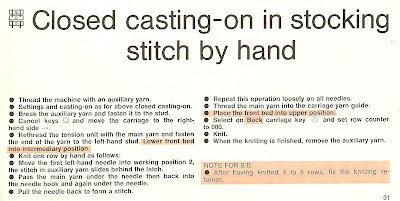
Now, hidden within your SUPERBA instruction manual - and not well explained - is the "Closed Casting-On In Stocking Stitch By Hand" method. What a mouthful! LOL!

This cast on method is very similar to the Waste Yarn + Ravel Cord Method, just minus the Ravel Cord.
 |
©Patrick Madden/Superba Knitting™ |
Let me break this down for you. The Waste Yarn + Ravel Cord Method is comprised of three sections:

• Section A: The Open Cast On With Waste Yarn
• You begin by quickly establishing stitches on your machine using a "Waste Yarn" formed over the Cast On Comb as per the Open Cast On Method.
You work a few rows with this Waste Yarn to allow gravity to take effect and these rows of knitting to create some tension on the stitches on the machine needles. Generally one works 10-15 rows of Waste Yarn.

Section B: The Division Row with Ravel Cord.
You will then remove the Waste Yarn from the carriage and thread up a smooth yarn or Nylon Cord referred to as a Ravel Cord.
Ravel Cords are traditionally fine lengths of smooth, strong Nylon that one can remove very quickly as they don't break and rarely cling to other fibres.

Ravel Cord can also be any smooth, strong yarn like Rayon, Cotton, Linen - even Dental Floss! Don't laugh, it works.

You work only one row in Stocking Stitch with this Ravel Cord, so you don't need very much: 3-4 times the width of the knitting on your machine bed is enough.
This cord acts as a dividing line between the Waste Yarn section and the Closed Cast On edge you will form next.
The Ravel Cord will be removed at the end of this procedure and the Closed Cast On will separate from the Waste Yarn used in the Open Cast On.
These two steps combined are known as the ”Waste Yarn + Ravel Cord Cast On”.

Section C:
Work the Closed Cast On Technique.
Work the Closed Cast On Technique.
You will now form a Closed Cast On Technique of your choice - be it the e-Wrap, Long Tail, Crochet or Tubular technique - directly over the Ravel Cord Stitches.
You can work this for both Single Bed and Double Bed stitch techniques. For this sample I used the Crochet Cast On technique.

The Ravel Cord is fine enough that it does not distort the edge of your knitting and it's smooth enough that it will not get tangled and is easily removed when this Cast On Method is done.

Once you've completed the Closed Cast On Technique directly over the Ravel Cord stitches, you'll thread the knitting machine Carriage with your Main Yarn and continue to knit your project.


When you have completed your knitting and have Cast Off your stitches, you will remove the Cast On Comb from the fabric, then remove the Ravel Cord, effectively separating the Waste Yarn from the Main Yarn.


You will discard the Waste Yarn + Ravel Cord and you will be left with a tidy, uniform Closed Cast On edge to your knitting, without any distortion of stitches.
 |
| Crochet Cast On Edge After Waste Yarn & Ravel Cord Method. |
Here are photos of a Tubular Cast On technique worked using the Waste Yarn & Ravel Cord Method with a Solid Back Jacquard stitch technique for the striping.


Beginning with the Waste Yarn & Ravel Cord ensures these edge stitches are formed consistently and with no resulting flare to the edge of the finished knit fabric.
 |
| Clip The Waste Yarn To Release & Separate. |
 |
| Pull On The Ravel Cord To Remove. |
 |
| Remove and Discard The Waste Yarn & Ravel Cord. |

 |
| You Are Left With A Beautiful, Round, Tubular Edge. |

 |
| 2x2 Ribbing Started With Waste Yarn + Ravel Cord / ©Superba Knitting |
Reminder: I will post separate, expanded tutorials for each of the Closed Cast On Techniques I covered in this post, including instructions for starting with Waste Yarn + Ravel Cord.
 |
| 2x2 Ribbing Started With Waste Yarn + Ravel Cord / ©Superba Knitting |
Take good care and happy knitting.
Patrick Madden.
www.superbaknitting.com