Greetings!
In this post I provide a summary of common Knitting Machine Terms and Abbreviations for owners of Superba Double Bed Knitting Machines.
I use a form of shorthand when writing my own patterns or for taking notes when working on a published pattern from a book or magazine. This can consist of both symbols and abbreviated words, influenced by years of following knitting patterns published for Japanese knitting machines like Studio, Knitmaster, Singer, Silver Reed and the Knit King, Jones, Brother knitting machines. Also, hand knitting references make their way in to my instructions.

For those of you new to knitting on a Superba Knitting Machine, you will undoubtedly encounter knitting patterns written from the perspective of the Japanese brand machines, the Swiss Passap system and you will find patterns written for Singer/Superba machines in publications from the United Kingdom, Germany and France.

As you work your way through these patterns or charts, you may find it confusing to understand the abbreviations and symbols used or how they translate to your Superba Knitting Machine. I have taken the liberty of creating this list of common Machine Knitting Abbreviations to help Superba Knitting Machine owners decipher this coded language when you encounter it.

HOW TO PRINT THIS
You may download and print a copy of this off of the Yahoo SuperbaWhite Group. The file format is Adobe pdf. Here is the link to the SuperbaWhite group. You must join this group before you can access this document.
For those of you not computer or web savvy, I am presenting it in it's entirety for your viewing pleasure here on my weblog. I know a few references/terms found their way into this abbreviation list but I felt it necessary to include them for clarification.
**NOTE: Abbreviations may have more than one term or reference. How this translates specifically to a Superba Knitting Machine is printed below each term in BOLD type. Depending on the way the pattern is written and where the symbol/abbreviation appears in the pattern will determine the context in which it is used.
This is just the beginning of this list. I will update and add information to translate Passap knitting machine terms as time allows.

I am also working on a Glossary of knitting terms for Superba knitting machines as well as compiling a list of Japanese Machine Knitting Symbols for those of you interested in creating detailed double bed and lace stitches by hand. This should be available shortly.
If you care to contribute something, or wish to see anything added, please email me or post it on the Yahoo Superba/White Group.
**NOTE: Abbreviations may have more than one term or reference. How this translates specifically to a Superba Knitting Machine is printed below each term in BOLD type. Depending on the way the pattern is written and where the symbol/abbreviation appears in the pattern will determine the context in which it is used.
This is just the beginning of this list. I will update and add information to translate Passap knitting machine terms as time allows.
I am also working on a Glossary of knitting terms for Superba knitting machines as well as compiling a list of Japanese Machine Knitting Symbols for those of you interested in creating detailed double bed and lace stitches by hand. This should be available shortly.
If you care to contribute something, or wish to see anything added, please email me or post it on the Yahoo Superba/White Group.
Take care and happy knitting.
Patrick Madden.
Toronto, Ontario CANADA
www.superbaknitting.blogpsot.com
superbaknitting@gmail.com
Patrick Madden.
Toronto, Ontario CANADA
www.superbaknitting.blogpsot.com
superbaknitting@gmail.com

KNITTING MACHINE ABBREVIATIONS FOR SUPERBA~WHITE~SINGER~ PHILDAR
By Patrick Madden
A → Colour A, the Main Colour, Main Yarn, Yarn Feeder A, Background Yarn, Needle Position A or Non-working Position.
Superba: “Yarn Guide” on Single Bed Carriage and Double bed model Back Carriage. Also, Slot “D” on the Second Yarn Guide. The Main Yarn is threaded here.
A/H → Arm Hole
ALT or Alt → Alternate(ly)
Superba: Flow Combs Alternate, Alternate Needle Arrangement or 1x1
Approx → Approximately; an average, a ball park figure, a guesstimate.
atst → At the Same Time: Perform either the same technique or an alternate at this stage of knitting; IE decreasing armhole and then starting neck decreases.
B → Colour B, Contrast Colour, Background Colour, Background Yarn, Needle Position B or working position
Superba: Needle Position No.1, Second Yarn Guide; colour 2
BB → Back Bed; The main bed for Japanese Machines, the secondary bed for Passap.
Superba: Back Bed
Beg → Begin(ning); the start.
BET → Between.
Bind Off → To Remove stitches from machine, same as Cast Off.
BK → Back; IE BK Neck.
BO → Bind Off; same as Cast Off, to remove stitches from machine.
BOLT → Bind Off with Latch Tool, aka Crochet or Slip Stitch Cast Off.
Superba: Casting Off Method 2: page 35 of instruction manual.
C → Contrast, Centre, Colour C, Third Colour, Needle Position C; ie “ move needles in hold to C Position…:
Superba: Needle Position No. 2 stitches behind latches of needles.
C on → Cast On; to start knitting, establish stitches on machine needles.
C off → Cast Off; to remove stitches from machine, same as BO.
Cast On Loosely → One deliberately makes the cast on stitches or loops very loose so that the finished edge will stretched when blocked. Useful for lace or shawls.
CAL/COL → Carriage at Left/Carriage on Left; “With COL, Cast on 35 sts….”
CAR/COR → Carriage at Right/Carriage on Right; “End with COR…”
Carr → Carriage.
CB → Centre Back, the exact centre or vertical line along the garment back. 99% of knit garment pieces are symmetrical in shape, so shaping is usually the same on both sides. This is a reference point when shaping.
CC → Contrast Colour.
CF → Centre Front. See CB.
cm → Centimetre.
cntr → Centre. Or "Center", as spelled in the United States.
Cntr 0 → The exact centre of your needle bed. Usually marked with "0" along the numerical graduated scale printed or engraved on your knitting machine bed.
CO → Cast On; to begin knitting, establish stitches on machine needles.
COBH → Cast On By Hand; just as it says, “COBH using e-wrap method…”
Col → Colour, color.
Con → Contrast.
Cont → Continue(ing).
D → Fourth colour, Holding Position, Needle Position D; IE “Pull all ndls to D pos…”
Superba: Needle Position No. 3, holding position, pg. 11 of instruction book.
DB → Double Bed, two separate beds of needles positioned to face one another and knit intricate stitch combinations.
dbl → Double
dc→ Decrease.
Dec/dec → Decrease; reduce number of stitches or stitch size.
DETT → Double Eye Transfer Tool, for transferring single stitches between needle beds on Double Bed knitting machines.
div → Division, divide, dividing.
DK → Double Knitting;; a yarn weight achieving 22 – 24 stitches per 10cm/4”.
E → E position. Upper Working Position.
Superba: Needle Position No. 3, holding position, pg. 11 of instruction book.
ea → Each.
E/N → Every Needle.
E/R → Every Row.
EON → Every Other Needle; alternate needle selection IE 1x1 rib.
EOR → Every Other Row; alternate rows IE “ alt ndls will Tuck EOR…”
EOS/EOST → Every Other Stitch.
Ev → Every.
e-wrap → A cast on technique done by hand, wrapping each needle selected with yarn as if writing litle "e's".
F/Ft → Front.
FA → Feeder A, also “A Long, Long Way to Run….”
FB → Feeder B, Front Bed; this is the ribber or secondary bed for Japanese machines and the main bed for Passap.
Superba: Front Bed.
FF → Fully Fashioned, full fashion; decrease/increase techniques that take place within the fabric, not directly on the edge, creating a decorative line of shaping.
FNP → First Needle Position.
Superba: Needle Position No. 1.
FNR → Full Needle Rib, Double Rib; double bed stitch where all needles on both beds are selected creating a dense, close fabric.
Superba: Close Rib, pg. 47 of instruction manual.
FI → Fair Isle, aka “Knit-In”. A Single Bed knitting machine technique using two colours knit in the same row to a specific stitch pattern.
Superba: pg. 57 of instruction book. Knit on Single Bed or Back bed for DB Models. Use the 2nd Yarn Guide with special carriage settings.
Fdr 1 or A → Feeder 1, Feeder A. Main Yarn Feeder. The Main Colour is usually threaded in this slot on the carriage.
Superba: “Yarn Guide” on Single Bed Carriage and Double bed model Back Carriage. Also, Slot “D” on the Second Yarn Guide. The Main Yarn is threaded here.
Feeder 2 or B → Secondary Yarn Feeder. The Contrast Colour is usually threaded in this slot on the carriage.
Superba: Slot “E” on the Second Yarn Guide. “Second” yarn is threaded here.
Fig. → Figure; referring to a drawing or diagram, IE “Using the stitch design shown in figure A…”
Foll → Following.
g or gm → Grams, Yarn weight measurement, IE “ Zara is sold in 50g balls, 50 grams = 1 ¾ oz.”
GB or G-Bar → Garter Bar; a tool used for turning stitches over on single bed machines to create “Garter Stitch” fabric.
GC or G-Carr → Garter Carriage; an electric carriage that will automatically knit and reform stitches on single bed Brother/Jones/Knit King machines.
Superba: Garter Carriage/Garter Lace Transfer Carriage.
GLTC → Garter Lace Transfer Carriage. An optioanl accessory for Superba, White, Singer and Phildar knitting machines made in France by Superba. Used for transferring individual or groups of stitches to create combined knit/purl textured stitches and Racked Lace.
H → Hold. To place a specific number of stitches into Holding Position.
HP → Holding Position, referring to the needle position. This is usually position D or E depending on the machine. The needles are brought all the way forward and not selected to knit, which is used for “Short Row” or “Partial Knitting” shaping techniques.
Superba: Holding Needle Position No.3, pg. 11 and pg. 20 of instruction book, WITH the NRB’s or Needle Return Buttons on Carriage set to neutral, see pg. 13 of instruction book. Needles are at their highest position on the needle bed, and the needles do not knit but HOLD the stitches.
H/P → Half Pitch; for double bed knitting machines where needles are selected on both needle beds, and the FB is positioned laterally by half a needle position so the needles do not collide and break.
Superba: Flow Combs Alternate, Intermediary Lever on the FB set at Alt.
HW → Hang Weights.
In(s) → Inches.
Inc/INC → Increase.
K → Knit. Both a noun (the actual stitch) and a verb (Knit 20 rows).
KH → Main Bed, knitting carriage; a term used by Knit King/Jones/Brother machines to describe their single bed knitting machine models, IE KH-260.
Superba: The Single Bed Carriage, The Back Carriage.
KWK → Knit across, wrap, Knit back; an instruction to follow when “partial knitting” or knitting “short rows” shaping technique.)
K Carriage → Knitting Carriage
Superba: The Single Bed Carriage, The Back Carriage.
L or l → Left. Long. Length.
LC → "Left Cross" when producing Cable Stitches.
LHS → Left Hand Side.
lgth → Length.
LPC → Lock Punch Card. This is used to either memorize the first row of the pattern card, or to produce stripes in the knit fabric.
Superba: Pause Row Advance or Program the stitch pattern and begin 1st row, depending on context.
M → Main, Main Colour, Marker.
MB → Main Bed. For Japanese machines, this is the single bed knitting machine. For Passap machines, this is the Front Bed.
Superba: For Single Bed models this is the Main Bed. For Superba Double Bed Models, this is the Back Bed.
MC → Main Colour.
mm → Millimetre. Metric measurement.
MT → Main Tension. The number setting on the stitch size or tension dial. The main tension the garment is knit with.
Superba: Stitch Size (SS), see pg. 12 of instruction manual.
MT -1, -2, -3 → Main Tension Less 1, 2, or 3 number settings. Used for rib settings on Japanese machine patterns.
MT +1, +2, +3 → Main Tension Plus 1, 2, or 3 number settings.
MY → Main Yarn. The yarn used primarily in a garment. Same as MC.
n(s) / ndl → Needle(s).
ndls. → Needles.
NB → Needle Bed.
NRB → Needle Return Button. Found on Superba knitting machine carriages. These control needles in holding position and are used for knitting Fair Isle and Jacquard by selecting needles to knit the 2nd yarn colour.
NWP → Non-working Position. Position A on Japanese knitting machine needle beds. Needles are out of work.
Superba: Non- Working Needle Position No. 0, see pg. 11 of instruction book.
Notch → A yarn marker placed along both sides of a seam to aid in sewing sections together evenly.
Opp. → Opposite.
OWP → Out of Work, Out of Working Position.
oz → Ounce, ounces.
P → Purl. Plain. Place.
Patt(s) → Pattern, patterns.
PC → Punch Card, Provisional Cast On
PK → Partial Knit.
Pl → Plain.
PM → Place Marker.
PN → Place Notch.
PU → Pick Up.
Provisional Cast On → A temporary cast on method. See "WY/RC CO." In machine knitting this usually means with Waste Yarn, aka Auxillary Yarn in your Superba instruciton book. One will then complete a closed cast on immediately following or after the piece is removed from the machine.
R/r → Row, rows.
R/Rt. → Right.
RB → Ribber Bed. Most Japanese machines are sold as single bed knitting machines with a “Ribbing Attachment” or ribber. The ribber can be removed from the knitting machine when not needed. Also found as Rear Bed.
Superba: The Front Bed on Superba Double Bed models. A second bed conversion kit was sold for Superba Single Bed models to convert them to a fixed Double Bed machine. The second bed is not removeable. It is permanently attached.
RC/R.C. → Row counter. Also Ravel Cord. "Right Cross" when producing Cable Stitches.
RH → Right Hand, Rehang.
RHS → Right Hand Side.
RP → Rest Position.
RPc → Release Punch Card.
Superba: Activate Stitch Pattern and begin knitting immediately after programming stitch pattern.
RS → Right Side. Depending on the stitch technique used, the side that will be facing out on your garment.
RT/rt → Right. Rib Tension. The setting of the stitch size dial on Japanese ribbers.
Superba: Front Carriage Stitch Size setting.
RW/rw → Row.
Ravel Cord → Very thin Nylon cord, used for cast on procedures using Waste Yarn (WY). The Ravel Cord is knit between Waste Yarn and the Main Yarn (MY), making the removal of the WY from MY easy.
Rem → Remaining.
Rep/rep/rept → Repeat.
rnds → Rounds. Used when knitting "in the round" or Circular Knitting. In circular knitting, as the completed rounds stack up on one another like a coil, you must mark the beginning and end of a round, and count these completed revolutions in your knitting. On a double bed knitting machine, we would begin knitting with our carriage at the right hand side, thus the start of the round. In setting our carriages to knit circular, we would pass the carriages from right to left and the machine will knit on the front bed only and then moving left to right it will knit on the back bed only, completing one round. Thus, two passes of the carriages equals 1 round.
S → stitch.
SB → Single Bed.
Superba: Selection Box.
SC/sc → Single crochet.
SD → Stitch Dial. For setting stitch size or tension of knit fabric.
SH → Shoulder.
SL/sl → Slip Stitch. The stitch is not knit, the yarn passes in front of the stitch on the purl side and knits the next or corresponding stitch depending on the stitch pattern.
Superba: select stitch key 0 for slip stitch.
SR, SHR, s/r → Short Row. aka Partial Knitting. A shaping technique for shoulders, etc., where one selects only a certain number of your total stitches to knit. The stitches you do not wish to knit are place in "holding" position. On a Superba this is Holding Position No.3. To prevent holes forming between rows, the last needle closest to stitches knitting is wrapped with the main yarn to close any gap that may form.
SS → Stitch Size. The setting number of the tension dial on your carriage(s). Also, Side Seam.
Superba: See pg. 12 of instruction book.
St st → Stocking Stitch, aka Stockinette Stitch.
**The most basic stitch a Single Bed knitting machine can produce. For comparison, in hand knitting it is Garter Stitch (knit every stitch, every row – which is one of the hardest for a knitting machine to produce). In machine knitting, due to the fixed position of the latch hook needles, they always produce Stocking Stitch. The resulting fabric has a definite Knit Stitch side and a definite Purl Stitch side. The Purl side is always facing us when knitting Stocking Stitch on the back or main bed.
Sts → Stitches. Individual needles holding yarn formed in loops.
ST–RS– X’s → Stitches-Rows-Times. Garment shaping instruction formula, indicating the number of stitches one would inc/dec, the number of rows between and the number of times to repeat this, IE. 2-8-5 would read as Decrease 2 stitches every 8th row, 5 times. Used frequently in Japanese garment patterns.
sk → Slip Knot: A secure and discreet knot which loops over itself and tightens to look like any other stitch. Used when casting on by hand.
T → Tension.
TD → Tension Dial.
Superba: Stitch Size Dial.
TEN → Tension.
tog → Together, ie K2tog = Knit two stitches together.
TR → Turning Row, Transfer
Trans → Transfer. To move stitches, needle to needle on the same or alternating beds.
tt → Transfer tool. Tappet tool (see latch tool.)
UWP → Upper Working Position. On Japanese machines this is either needle position C, D, or E, depending on the context.
Superba: Working Position No. 2 or Holding Position No.3
W → Work. Wide. Width.
wd → Wide. Width.
WP → Working Position.
WS/ws → Wrong Side.
Wt/Wts. → Weights.
WY → Wast Yarn. Used in provisional cast on methods and closed cast on methods. One establishes stitches and a few rows of knitting before knitting with or casting on with Main Yarn. Superba: your instruction manual refers to WY as “Auxillary Yarn”. See pg. 31, “Closed Casting-On in Stocking Stitch by Hand”.
wy/rc co → Waste Yarn & Ravel Cord Cast On. Indicates that a provisional cast on is to be used beginning with rows of waste yarn, seperated by one row of ravel cord. One can then complete a closed cast on (usually by hand) or begin knitting with main yarn and return later to complete this edge.
X → Times. A multiple of…
YF → Yarn Feeder.
Superba: Yarn Guide.
YM → Yarn Marker. (See PM and Notch).
Patrick Madden.
Toronto, Ontario CANADA
www.superbaknitting.blogpsot.com


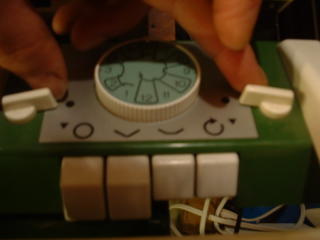
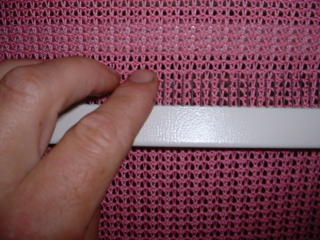
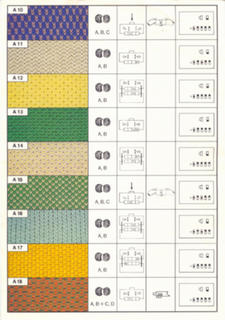
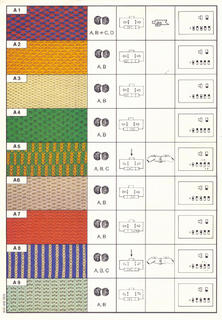 Following the instructions on the programming cards for yarn weight, carriage settings, accessories and Selection Box switch settings, you can achieve 18 various stitch techniques using the basic 1x1 needle arrangement, including Single Bed Fair Isle, Weave Technique, Jacquard and Double Bed Tuck. The photo below shows stitch pattern A7, which is a Single Bed Tuck Stitch knit in Clea Cotton. This is shown in the programming "HOW TO" below.


 the
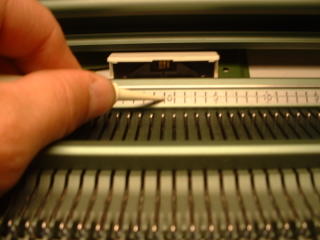
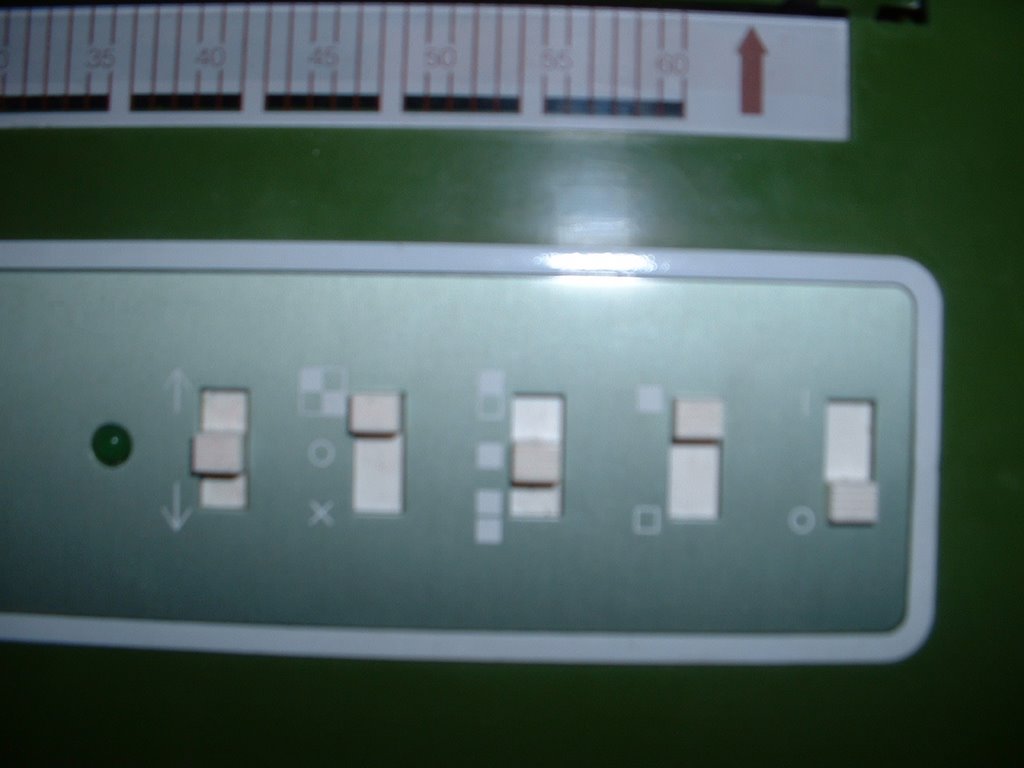
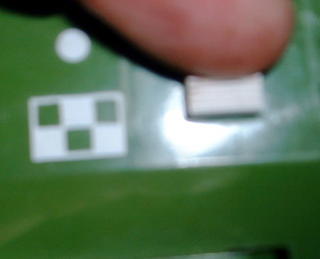
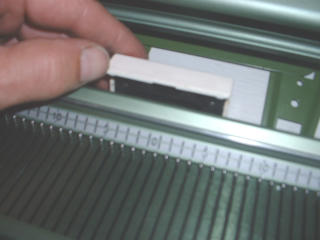
the 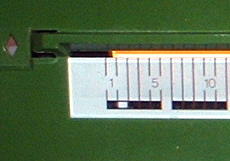 The photo above captures a picture of the Cursor Reference Mark - it is the white square, the photo below indicates it should be all the way to the left in the first square. This aligns the Selection Box Cursor Indicator with the Cursor on the back needle bed.
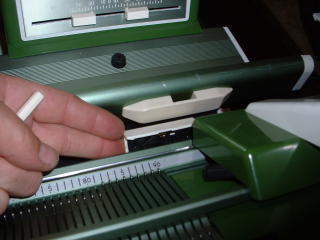
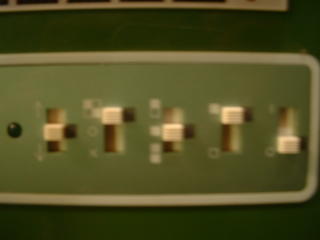
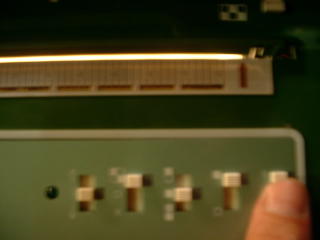
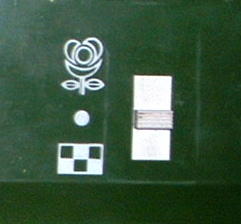 Now we need to tell the Selection Box which is the first needle or starting point of our stitch pattern. For Superba machines the default is always Needle No. 1 to the left of centre "0".