

Superba produced two styles of plastic bed Hobby Knitting Machines:
 |
| PHILDAR Quickphil 5mm Gauge Hobby Knitting Machine |
• The 5mm gauge plastic bed hobby model home knitting machine has 180 needles and the basic stitch this machine creates in Stocking Stitch.
• This 5mm hobby model was designed to knit finer hand knitting yarns like Lace Weight, 3-Ply, 4-Ply Fingering, Fine Baby Yarn, Sock Yarn, Sport Weight, Double Knitting (DK) and Light Worsted Weight Yarns.
• The 5mm gauge hobby model uses the same parts and size of needles as the Double Bed model knitting machines.
 |
| SUPERBA S9 9mm Gauge Hobby Knitting Machine |
• The 9mm gauge plastic bed hobby model home knitting machine has 110 needles and the basic stitch this machine creates in Stocking Stitch.
• The 9mm gauge hobby model was designed to knit medium to heavy thickness hand knitting yarns like Double Knitting (DK), Worsted, Chunky and Bulky weight yarns.
• The parts and accessories for this 9mm Gauge model are not interchangeable with other models due to the larger needle size.

This post focuses on the 9mm Gauge model.

9mm Hobby Model Brand Names.
This is my WHITE S9 model Hobby Knitting Machine, which I bought on eBay in 2006 from the United States.
This is exactly the same knitting machine as other S9 models sold around the world by the following brand names:
SUPERBA S9:
SINGER S9, Designer 2, Big 9, Solo Models.


NINA S9 for Bernina of South Africa

My Rocks MR9: Private Label in France.
 |
| My Rocks MR9: These are left over stock produced by Superba, used with the MR9 Label. |
and the popular PHILDAR "Big Phil".


You can identify the model number and serial number of any S.I.T./SUPERBA brand knitting machine by turning the machine over. You will see this sticker attached to the machine base.

These Hobby Knitting Machine models are the most basic of home knitting machines to operate. They were designed for ease of use, to be quickly set-up and easily stored.

The S9 Hobby Knitter Model Parts.
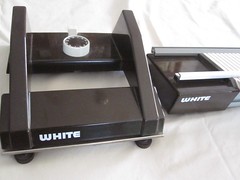
The S9 9mm Gauge Hobby Knitter came with the following parts and accessories.
 |
| Singer Solo 9mm Hobby Knitting Machine With Standard Accessories. |
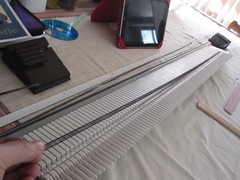
• The S9 Knitting Machine Bed:

The machine bed consists of an aluminum frame with moulded plastic end caps and plastic moulded needle channels.
This combination of materials was chosen to keep the machine lightweight and portable.


The S9 Machine Bed measures 126cm/49.5" L x 15cm/ 6" W.
 |
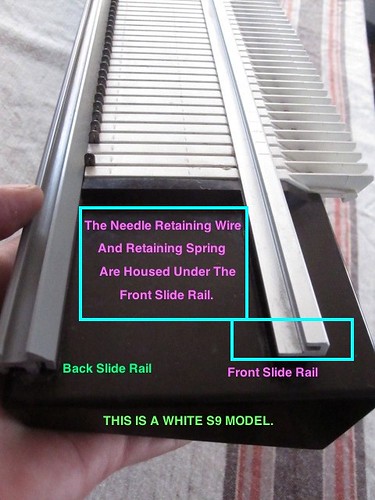
| White S9 Hobby Knitting Machine Needle Bed - Top View. |
 |
White S9 Hobby Knitting Machine Needle Bed - Side View.
|

The Machine Bed Side View:

The Machine Bed Top View:

• The Needle Bed: This is where the needles are inserted and removed. You have 115 Needles to knit with AND this is the area where the Carriage controls and moves the needles back and forth to form stitches.
• The Needle Scale: This is used for quickly counting stitches, with markings starting in the centre of the needle bed at "Centre 0" and in increments of 5 and 10. Each individual needle is marked with a vertical line.


Also, directly underneath the Needle Scale is a hidden Retaining Wire Spring and the Needle Retaining Bar, which hold the Latch Hook needles in place, under tension.

IMPORTANT!: The Needle Retaining Spring + Bar are crucial to the operation of the machine. I explain how to Change A Needle and to locate and remove the Retaining Wire Spring and Bar further in this post.
• The Flow Combs: The Flow Combs are the tooth-like protrusions at the edge of the needle bed which separate each needle from it's neighbour.

Flow Combs also aid in the formation of stitches, providing leverage for the Carriage as new stitches are formed.

*CAUTION: The Flow Combs are not indestructible. I recently lent my S9 Model Machine to a friend to use and was returned with two of the Flow Combs broken! So take care when storing the machine and moving it.

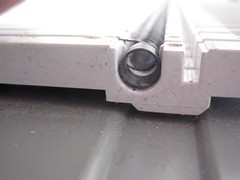
• The S9 C-Clamps x 2:
The Machine comes with 2 C-Clamps used to attach the knitting machine to a table.

These attach to the base, and are spaced approximately 56cm or 22" apart.

The clamps have these great yarn clips attached to hold your yarn tail when you begin to Cast On and Knit.

The S9 Hobby Knitting Machines rest easily on any table, and while they have rubber grips on the base to prevent the machine from shifting, they should be clamped to the table or stand to prevent movement of the unit while operating.
Besides, why take the chance of the machine falling off the table and becoming damaged?
Besides, why take the chance of the machine falling off the table and becoming damaged?

• The S9 Row Counter.
The Row Counter attaches to the back of the knitting machine frame, directly to the 'Back Slide Rail'.
 |
| S9 Hobby Knitter Row Counter |
 |
| Row Counter Rear View. |


Voila! The row counter is attached.

• The S9 Carriage:

The S9 Carriage is comprised of:
• The Handles:
You grip the Carriage by the Handles when you want to move it to form a row of knitting.
• The Stitch Selector:

Position 2, with the selector raised, is the standard position for working Stocking Stitch.

Postion 1 allows, pressed down and flush with the carriage, is for fancy and decorative stitches to be created by selecting needles by hand.
• The Stitch Size Dial:

The lower the number, the smaller the stitch and the denser your knit fabric.

The higher the number results in looser, larger stitches.
TIP: Sit with you machine and a variety of yarn weights and sample the different number settings and half settings to determine and know the appropriate number on the dial for Worsted, Chunky and Bulky yarns.
Record the information, then wash and lightly steam the swatches. Then measure their Gauge: the number of rows and stiches over a 10cm/4" square.
• The S9 Carriage Underside:
• The Handles:
You grip the Carriage by the Handles when you want to move it to form a row of knitting.
• The Stitch Selector:

Position 2, with the selector raised, is the standard position for working Stocking Stitch.

Postion 1 allows, pressed down and flush with the carriage, is for fancy and decorative stitches to be created by selecting needles by hand.

The lower the number, the smaller the stitch and the denser your knit fabric.

The higher the number results in looser, larger stitches.
TIP: Sit with you machine and a variety of yarn weights and sample the different number settings and half settings to determine and know the appropriate number on the dial for Worsted, Chunky and Bulky yarns.
Record the information, then wash and lightly steam the swatches. Then measure their Gauge: the number of rows and stiches over a 10cm/4" square.
• The S9 Carriage Underside:
The underside of the Carriage is laid out very simply and these units operate without the need for very much, if any oil. The plastic on plastic parts were designed to operate without a lot of oil.
If you do oil the machine, add a fine sewing machine oil to an old t-shirt and rub the fabric along the yellow line in the photo below.
Of interest on the bottom of the Carriage is the Back Rail Slide, which is what attaches to the Knitting Machine frame, and the Brushes mounted on the Knitting Retainer.

• S9 Carriage Brushes & Knitting Retainer
This style of Carriage has 2 sizes of brushes underneath which rotate and move as the Carriage moves, pressing against the rows of stitches as they descend from the needles, helping to create our knit fabric.
This style of Carriage has 2 sizes of brushes underneath which rotate and move as the Carriage moves, pressing against the rows of stitches as they descend from the needles, helping to create our knit fabric.
 |
| White S9 9mm Gauge Hobby Knitter Carriage - Underside. |
This forward section is known as the Knitting Retainer. In english "retain" means to hold, and you will see the word "retainer" used twice with these knitting machines.
The Knitting Retainer Brushes should rotate freely, otherwise they will drag on your knit fabric, causing unsightly lines and marks and can damage more delicate knit fabrics.
Also, they will make it hard to slide the Carriage across when you wish to work a row of knitting.
If the Brushes don't spin freely, they are usually clogged with strands of yarn. Inspect the brushes regularly.


As you can see in the above photos, when I unpacked my White S9 Carriage upon receiving it, the Brushes on the underside were filthy and clogged with lint and yarn fibres. And they were difficult to move. I spent a long time cleaning these.
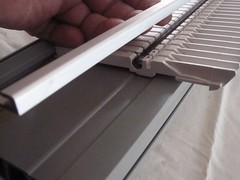
• Attach The S9 Carriage To the Machine:
The S9 Carriage attaches quickly and easily to the Knitting Machine Bed.
 |
| S9 9mm Gauge Hobby Knitter Carriage |
 |
| S9 9mm Hobby Knitter Machine Bed & Slide Rails |
Grip the Carriage by the handles and then line it up level, with the Back and Front Slide Rails.

Insert the Back Carriage Rail into the Back Slide Rail on the machine bed, keeping the Carriage level and slide it on.


The Carriage will lightly grip the Front Slide Rail.
The Carriage should slide back-and-forth smoothly and evenly.

These Hobby Knitters use Latch Hook needles to form stitches and create Stocking Stitch as their basic, automatic stitch technique.

Stocking Stitch, as it is called in english, or 'Jersey', is a two-sided knit fabric.

There is the distinct "Knit Side" with smooth, elongated stitch formations. The Knit Stitches resemble small hearts.

And there is the opposite "Purl Side" with a bumpy, undulating stitch formation.

The S9 Hobby Knitter is essentially a Stocking Stitch Knitting Machine. Understand that please!
This style of home knitting machine can form other styles of stitches, like Slip, Tuck and Fair Isle, but realize that these fancy stitches are created by manipulating the needles manually. They are not automatically produced.
These fancy stitch techniques can be challenging to produce.
These fancy stitch techniques can be challenging to produce.

*Note: Garter Stitch is repeated rows of the Knit Stitch, worked over and over. Garter Stitch is the most basic hand knitting Stitch, the very first one a knitter is taught. It has great qualities, the best being that Garter Stitch lays flat and will not curl. This makes it popular for the edges on scarves, sweaters and blankets.
Know that Garter Stitch is one of the most difficult stitches to produce on a home knitting machine.

Garter Stitch can be done - but it is technically challenging! It is not automatically created nor fast to produce on a knitting machine.
The same is true for Rib Stitches like K1-P1 rib. These are not automatic, basic stitches produced by this model.

Stocking Stitch Knitting Machines.
These Hobby Knitting Machines were made to facilitate the process of creating basic stocking stitch for hand knitters.
 |
Lorna's Laces Hand Dyed Mohair + Boucle.
|
These models use the most popular weights of hand knitting yarns. The 9mm Bulky model machine was introduced to accommodate thicker weights of hand knitting yarns like Worsted, Chunky and Bulky yarns.
 |
| © Superba Knitting™ |
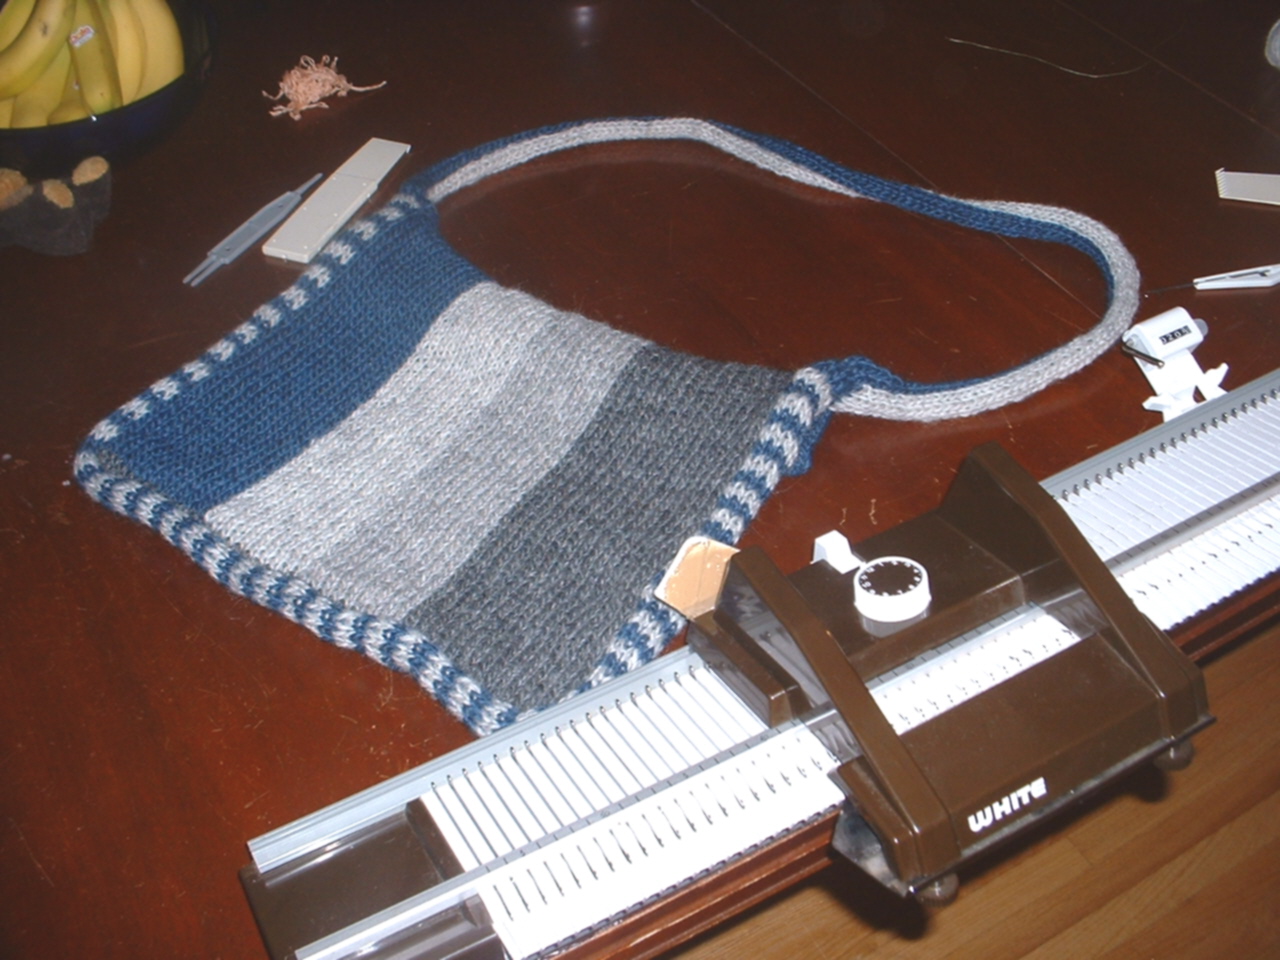
Don't be discouraged though, as the S9 Hobby Machines excel at a multiple colour stitch effect called Intarsia, in english.
Intarsia is a technique for working multiple colours of yarn at one time, across a row without any floats of yarn on the reverse. That is how I knit the wide bands of vertical stripes in the purse above and also how I knit the two-tone blue and grey handle.
Stripes are easy to work as well.
Both colour techniques were used in the handbag shown above.

S9 Model Latch Hook Needles:
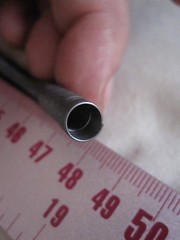
The Latch Hook Needles on the S9 Model are spaced 9mm apart. This is why this machine is referred to as a 9mm Gauge Knitting Machine.

The 9mm Gauge model has 115 needles spaced 9mm apart and each needle is 109mm in length.
IMPORTANT! Latch Hook Needles for this model should not be confused with the shorter, smaller needles for the finer 5mm Gauge Machines. The finer 5mm Gauge model knitting machines have 180 Needles spaced 5mm apart and 84mm in length.

The SUPERBA Latch Hook Needle is comprised of 3 Primary Parts that you will constantly interact with:
 |
| © Superba Knitting™ |
• The Needle Heel:
You use the Heel section of the needles when selecting stitches to work with. The Heel is also the part of the needle which is controlled by the Carriage when knitting rows.

• The Needle Latch:
• The Needle Hook:
The Latch + Hook work together in tandem when forming stitches, with the Latch opening and closing over the Hook and the Hook being the part of the needle which grips and holds the yarn as new stitches are formed.

To form rows of stitches, one lays the yarn across the open selected needles, making sure all the Latches are open:

Then you slide the Carriage across these needles. It is the Carriage which pulls the needles backward and closes the Latch over the Hook, forming new stitches with the yarn.

It is this movement which causes the new loop of yarn to be pulled through the stitches from the previous row. The previous row of stitches slip over the closed needle and are pulled downward by the Cast On Comb and weights.
The Carriage returns the needles to their standard forward position, ready for you to lay in the yarn for the next row.
You repeat this process over and over:
• Lay yarn across open needles.
• Hold yarn end with one hand, with slight tension on yarn.
• Slide Carriage across needles with other hand.

The Latch Hook Needles are held in place along the length of the needle bed by the Needle Retaining Bar and a hidden Retaining Wire Spring.

The Needle Retaining Bar helps to hold the S9 Model needles level and to prohibit their removal from the machine bed.
 |
| © Superba Knitting™ |

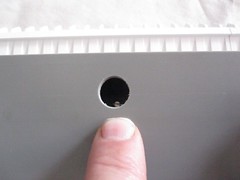
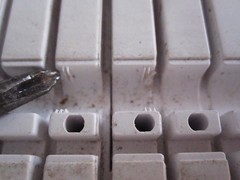
The Retaining Bar is accessed at the right end of the machine, next to where the white Flow Combs end, just under the Needle Scale.

Insert a transfer tool or screw driver and grip the small extension, then slide the bar out to the right.


 |
| © Superba Knitting™ |

 |
| S9 Retaining Bar © Superba Knitting™ |
 |
| © Superba Knitting™ |
The most important part to removing a needle that is damaged is to make sure the Latch is closed over the Hook of the needle before removing.

Why? To prevent the hook from catching and damaging the hidden Retaining Wire Spring.

The Retaining Spring sits directly under the numerical scale, and since it is hidden and out of your view, it can be easily caught and damaged by the removal of a needle. Trust me! I've done this.

That's why you are encouraged to take a pair of metal cutters and clip the Latch + Hook off all together.

But this can be hard on the hands, so if you don't cut these off, make sure the Latch is closed before sliding the needle backwards and out.

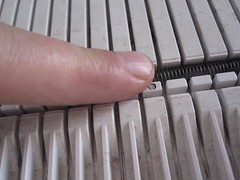
Once you have removed the Retaining Bar, the needles should be easy to move up a down.


Grip the Heel of the needle and pull it backwards, towards the back of the machine and then up at an angle, once the Latch Hook starts to move under the needle scale.
 |
| © Superba Knitting™ |


Continue to pull up and out until the needle is removed.


TIP: If you notice that the Latch is coming through in the open position, stop!

Don't force the removal of the needle. If it's hard to move, this usually indicates the hook has grabbed onto the hidden Retaining Spring.
Slide the needle forward again, close the Latch over the Hook and try removing. The needles should slide out fairly quickly.
How To Insert A New Needle On The S9:
Reverse the process by making sure the Latch is OPEN. If the Latch is closed over the Hook, it won't slide under the Needle Scale.

Grip the needle by the Heel and slide it forward, under the Needle Scale, then slide the needle all the way back to Non-Working Position.


 |
| © Superba Knitting™ |
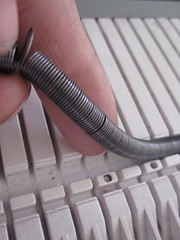
How To Check & Replace The Hidden Needle Retaining Wire Spring On The S9:
The 9mm Hobby Models use a combination of a **Retaining Bar** and **a hidden Retaining Wire Spring** to hold the needles in place on the needle bed during knitting.
The Retaining Wire Spring runs the length of the S9 needle bed and is situated directly under the Needle Scale/Front Slide Rail.

The S9 Latch Hook Needles are held in place **mainly** by the hidden Retaining Wire Spring, which provides resistance to the needles as they move forward and back.

A proper Retaining Spring will ensure they don't flop around and this helps the needles stay in their defined working positions on the needle bed.
Tip: If you are experiencing the problem of needles that slide back and forth too easily, needles that are stuck and will not move, I suggest you check the Retaining Wire Spring.
It may be damaged, and either you can repair the Spring or oder a new one and install it.
Let me show you how.
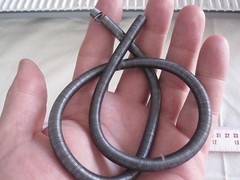
These are photos of the dimensions of the Retaining Wire Spring:
IMPORTANT! Superba made two sizes of Retaining Spring; one for the smaller 5mm size needle machine models and a larger Spring for the larger 9mm needles.
These are the dimensions of the Larger 9mm Retaining Spring:
• S9 Retaining Spring Length - 50cm
 |
| Model S9 Retaining Spring © Superba Knitting™ |
• S9 Retaining Spring Width: 0.06cm
 |
| © Superba Knitting™ |
 |
| © Superba Knitting™ |
I thought the needles were stuck due to lack of use, dirt, maybe rust. So I took a pair of needle-nose pliers and tried to force the needle out of the machine bed. WRONG!


What I could not see was that the Hook of the needle had caught the wire spring and I pulled the Spring out of shape when I forced the needle out of it's channel and the machine bed. MY BAD!
It was only after I had opened up the machine to get at the Retaining Spring, that I could see that it was in perfect condition.
So beware!
So let me show you how To Check and Replace The S9 Retaining Wire Spring:
1. Remove the Needle Retaining Rod. It's located at the far right end of the machine.
|
| © Superba Knitting™ |
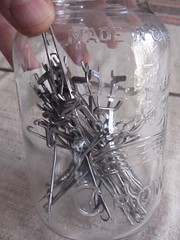
2. Remove All Latch Hook Needles. Close the latches first otherwise they will catch on the hidden Retaining Wire.
 |
| © Superba Knitting™ |

Place the needles in a glass jar and fill with Mineral Spirits to soak and remove any grime, rust and gunk. Remove and dry outside on a piece of newspaper, they dry quickly.
3. Turn the S9 Machine Bed over and remove the two exposed screws on either end of the machine using a Phillips or star tip screwdriver.

These will release the end covers. It will be easier to see the next series of screws if light can get into the machine interior.
 |
| © Superba Knitting™ |
4. Next, take a small, thin, flat-head screwdriver and loosen the 7 tiny screws inside the base of the machine, you access these through the holes in the bottom.
CAREFUL: These screws will come out and are a pain to get them back in. Trust me. So just loosen them, one at a time, working left to right. Keep unscrewing and they will release the Front Slide Rail that is covering the Retaining Spring.

 |
| © Superba Knitting™ |
CAREFUL! These screws will come out and are a pain to get them back in. Trust me.

So just loosen the screws, one at a time, working left to right. Keep unscrewing and they will release the Front Slide Rail that is covering the Retaining Spring. Turn the machine over and remove the Slide Rail.
You will then turn over the machine so the exposed Retaining Spring is sitting facing you.
 |
| © Superba Knitting™ |
IMPORTANT: Notice 2 things about this photo.
• 1: The Distorted Retaining Spring - it's been damaged by a needle hook catching and pulling on it, when I tried to force the removal of this end needle.
• 2: The small white plastic 'teeth' extending out from the channel the spring is sitting in. There are these teeth along the length of the machine at regular intervals and they grip and hold the Retaining Spring in place. And they do it very well with no need for additional screws or to fasten the spring off.

5. Remove the old Retaining Spring by lifting it out of it's channel using a screwdriver to release it.
 |
| © Superba Knitting™ |
6. Take your replacement Retaining Spring and re-insert it in the same manner:
 |
| © Superba Knitting™ |
I attached mine to the far right end, then extended the wire to the opposite left end, then pressed it down in place, making sure it was evenly distributed.
 |
| © Superba Knitting™ |
Remember: the fine little teeth that protrude in the Retainer Spring channel will grip the Retaining Spring, holding it firmly in place.
Note: I used my old Retaining Spring again, as it was in OK shape, other than at the far left, where I had pulled the needle out and distorted the coild of the Retaining Spring.

I was able to compress and fix the Spring with pliers and I tested needles in this area before replacing the Slide Rail cover.
7. TEST THE TENSION ON THE NEEDLES!
Take a Latch Hook needle and insert it into a channel on the machine bed and then slide it through the Retaining Spring. Then place the Retaining Wire Rod on top.
|
© Superba Knitting™
|
8. Now slide the needle back and forth in it's channel. You will know if there is enough tension/resistance on the needle and that the Retaining Spring is inserted properly.
Remove and reposition the coils on the Retaining Spring if there are small gaps and areas where there is not enough tension on the needles to hold them in place.
Remove and reposition the coils on the Retaining Spring if there are small gaps and areas where there is not enough tension on the needles to hold them in place.

9. Once you've fine tuned the position of the Retaining Spring, replace the Front Slide Rail by turning the machine over again and then tighten the screws from the bottom.

Tighten these one at a time and repeat as necessary until they catch the rail. I had a few fall out and had to use long needle nose pliers to get them back in.

10. Replace the end covers.

11. Replace all the needles once they are cleaned and dry and then replace the Needle Retaining Bar.


Voila! That's how you check and replace the Retaining Wire Spring.
I hope you found this information on the Superba, Singer, White, and Phildar S9 Hobby Knitting Machine to be of help.

I will be adding another post about Cast On Techniques, shaping methods and creating garments using this model at a later date.
Take good care.
Patrick.
Toronto, Ontario CANADA.