
Greetings!
Today I wish to share with you a Question that was posted on the Superba Knitting Group® on Ravelry regarding Tuck Stitch not forming properly and the answer I suggested.
About Ravelry & the Ravelry Superba Knitting Group:
For those of you who have not joined Ravelry, we have an active group discussion forum dedicated to all models of SUPERBA, SINGER, WHITE and PHILDAR knitting machines.
• What makes Ravelry a preferred website is the ability to post photos, videos and link to yarns and patterns within the Ravelry database and not worry about file size limitations. Other knitting machine internet forums, while still useful, are becoming tired and dated as you cannot share crucial information, most importantly photos, when you write your question or answer a question.
Ravelry is the world's largest and best social media website for textile enthusiasts who hand knit, machine knit, crochet, spin, weave and love all needle arts. Do join us.
For those of you not on Ravelry or who do not have the time to read all the discussion forum posts, I am posting some replies I have made to questions about various machine models here on my website.
I hope you find this information of help.

This week's original question was about problems knitting Tuck Stitch by the owner of a SINGER MEMO II electronic model knitting machine. This is the same machine as the SUPERBA S47, WHITE 1502 and PHILDAR D115 electronic pressure pad models.
Below is the original question and my answer.
QUESTION:
"I cannot get tuck stitch to work. I know it must be me as the other stitches work. All the carriage settings are correct, but all I get is one row of zig zag loops then the carriage jams on the second row. I am using Sirdar 4 ply on tension 7. Any suggestions anyone?"
ANSWER:
Here is a tuck stitch pattern from the SINGER MEMO II Instruction Book.
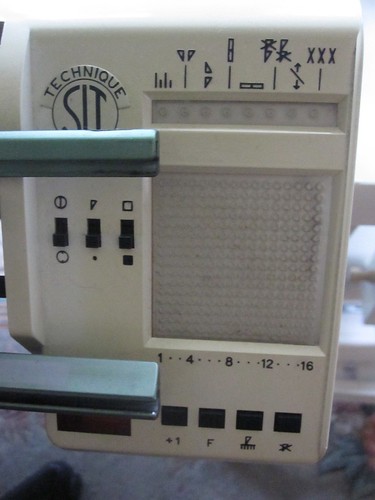
Please note that there are two switch symbols outlined in Red and Green that you must pay attention to when programming a stitch.
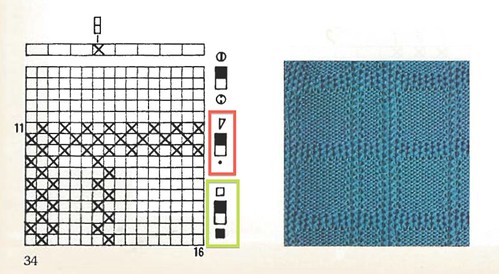
• First and foremost is the Selection Stop switch, outlined in Red. This switch controls the electronic programmer to either stop the stitch pattern from advancing or to run the stitch pattern as programmed, row-by-row.
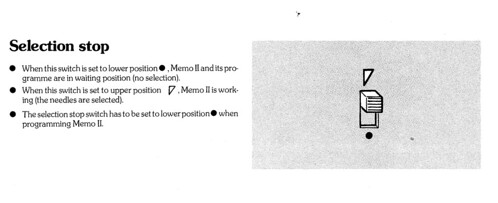
• When set to the upper setting which is the triangle symbol, the electronics will begin advancing through the stitch pattern you programmed row-by-row.
• When set to the lower setting which is the small circle symbol, the electronics will stop advancing the stitch pattern. This is where you want to set the Selection Stop Switch when programming any stitch pattern, including Tuck and Slip stitches.
• Once you have programmed your stitch pattern and pressed the Function button for the last time, pattern row 1 will be indicated on the LED display with a small triangle below it, and the machine is instantly ready to commence knitting the stitch pattern.
• When you are ready to work your Tuck Stitch, you then slide this switch upward to the slanted triangle symbol.
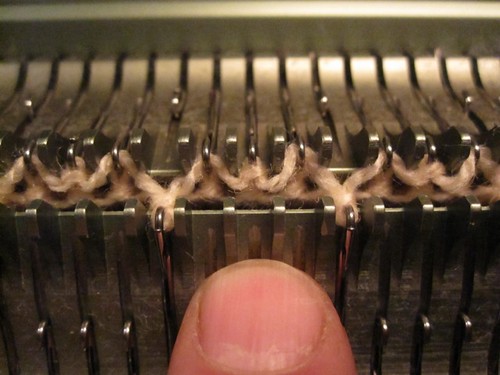
NOTE: After completing row 1, the Cursor will hit one of the Cursor Stops and send an instant signal to the electronics to advance to the next row in the stitch pattern, and this new row pattern signal is sent through the Cursor to the magnets under the carriage to select the needles for this next row.
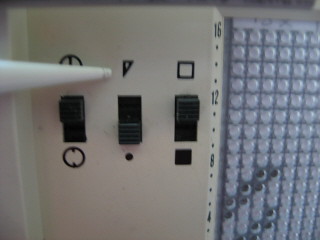
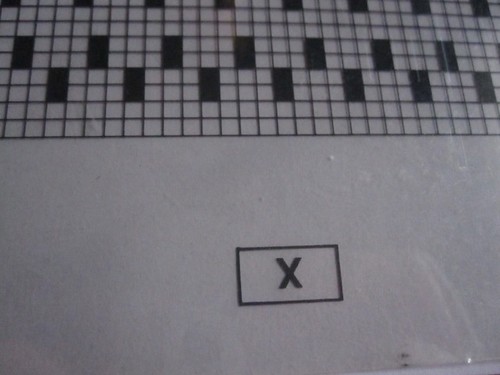
• The next crucial step during programming your stitch pattern is to have the "REVERSER" Switch at the correct setting for Tuck Stitch.
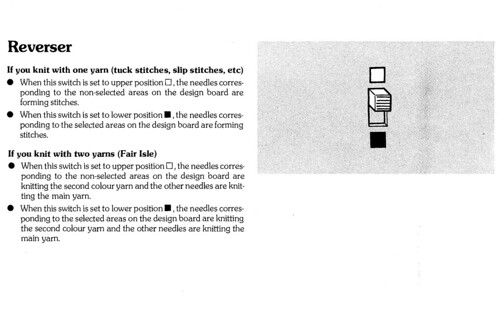 For single colour textured stitch techniques like Tuck and Slip you must ensure the "Reverser" switch, outlined below in green, is set to the upper position, which is a blank square symbol.
This next photo shows the setting on your model's electronic programmer. Other models have this switch too, only in a different location (see examples towards the end of this post).

This Reverser setting, when knitting a single colour textured stitch technique like Tuck and Slip Stitch results in that all the blank pattern squares will be worked in Stocking Stitch. Any square that is filled in will cause those stitches or needles to Tuck or Slip. So ensure the Reverser is moved upward before beginning to knit.
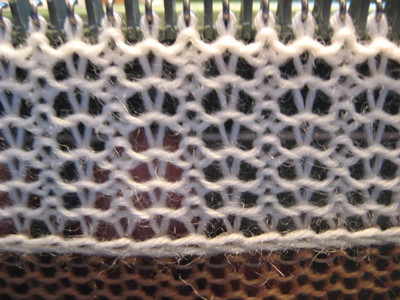
When the Reverser is set properly and when you have set the appropriate Stitch Size and Bed Space settings, your machine should form both Single Bed Tuck Stitches on the back needle bed . . .

• Also, if you wish to incorporate front bed knit stitches to create a Tuck Rib effect, you would still set the Reverser to the upper setting. When you commence knitting with the back and front carriages connected and the front needle bed positioned opposite to the back bed, the Back Carriage will select and Tuck the back bed stitches according to the stitch pattern you programmed while the Front Carriage selects and knits the selected needles in Stocking Stitch, creating the potential for many other stitch effects. Do try experimenting with these variations some time.
NOTE ABOUT THE REVERSER SETTING:
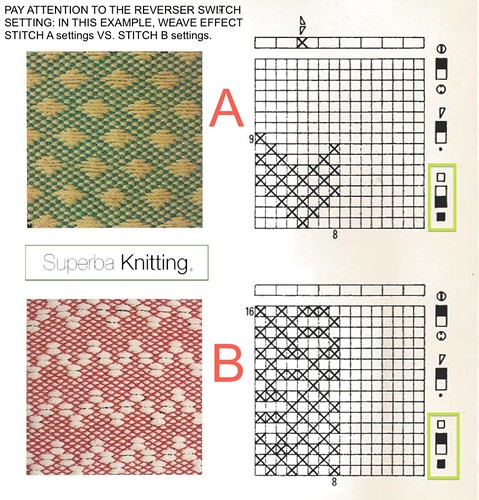
Some stitch techniques use both the upper and lower setting of the Reverser switch to achieve different stitch effects. This includes Single Bed Fair Isle and Weave Effect stitches. Below is a sample of two stitches worked in Weave Effect from the Pressure Pad model instruction book. Note that pattern A has the Reverser switch in the lower position, and pattern B has the Reverser in the upper position. You must be diligent in verifying the settings are correct before working your first row and the machine should knit the design properly.
All SUPERBA electronic model knitting machines allow you to change the Reverser settings at will; you don't need to reprogram the stitch design. Any changes are instantaneous.
Here are some photos of the various programme cards for three electronic models of SUPERBA that I used to create this simple Tuck Lace Stitch.
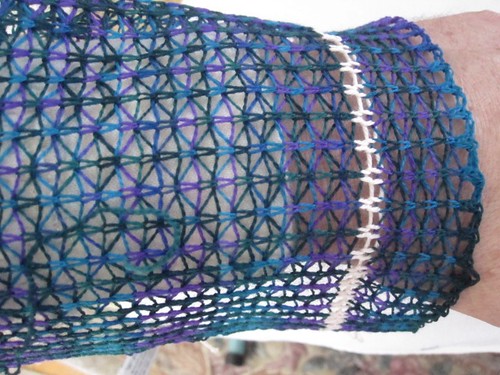
This SUPERBA Tuck Lace is worked on an "every other" needle set up on the Back Bed only, and the programme cards are filled in on every other square and the height of the dark squares is two rows, meaning the machine will tuck for two rows then shift to the alternate needles and tuck for two more rows, creating these lacy diamond stitches which look very pretty in a hand dyed yarn. The stitch pattern setting is 4 stitches wide x 4 rows high. The yarn is PRISM Lace Wool®.

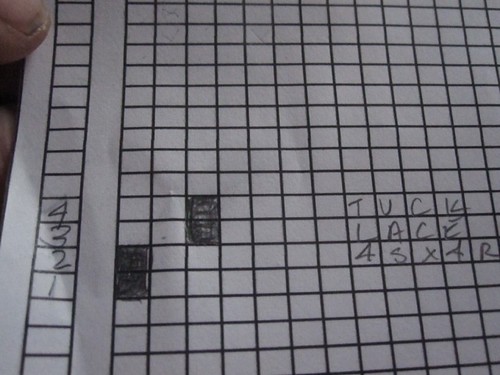
• To achieve this using the 16 stitch x 16 row Pressure Pad model machines, here is my hand drawn programme card for my Pressure Pad model, which includes a crude drawing of the Reverser switch and it's position, to remind myself of the correct setting, which is easy to overlook.

• Here is the same stitch pattern for the electronic Light Scanning Selection Box models . . .
• Here is the same stitch pattern for owners of the System 624 pressure pad model machines . . .

This makes for a very nice, open lace style stitch done using the Tuck setting on your SUPERBA.
ALSO NOTE:
For those of you with Double Bed model SUPERBA knitting machines, you have to adjust the Bed Space setting when working textured stitches like Tuck, Slip or Weave Effect to allow these bulkier, textured stitches to slip down between both needle beds. This adjustment should also be done for knitting thicker yarns in Stocking Stitch and double bed rib stitches.

I hope you find this information helpful and this solves the problem of the machine not forming the Tuck stitches properly.
See you again soon and happy knitting.
Patrick Madden.
Toronto, Ontario CANADA
www. superbaknitting.com

Today I wish to share with you a Question that was posted on the Superba Knitting Group® on Ravelry regarding Tuck Stitch not forming properly and the answer I suggested.
About Ravelry & the Ravelry Superba Knitting Group:
For those of you who have not joined Ravelry, we have an active group discussion forum dedicated to all models of SUPERBA, SINGER, WHITE and PHILDAR knitting machines.
• What makes Ravelry a preferred website is the ability to post photos, videos and link to yarns and patterns within the Ravelry database and not worry about file size limitations. Other knitting machine internet forums, while still useful, are becoming tired and dated as you cannot share crucial information, most importantly photos, when you write your question or answer a question.
Ravelry is the world's largest and best social media website for textile enthusiasts who hand knit, machine knit, crochet, spin, weave and love all needle arts. Do join us.
For those of you not on Ravelry or who do not have the time to read all the discussion forum posts, I am posting some replies I have made to questions about various machine models here on my website.
I hope you find this information of help.

This week's original question was about problems knitting Tuck Stitch by the owner of a SINGER MEMO II electronic model knitting machine. This is the same machine as the SUPERBA S47, WHITE 1502 and PHILDAR D115 electronic pressure pad models.
Below is the original question and my answer.
QUESTION:
"I cannot get tuck stitch to work. I know it must be me as the other stitches work. All the carriage settings are correct, but all I get is one row of zig zag loops then the carriage jams on the second row. I am using Sirdar 4 ply on tension 7. Any suggestions anyone?"
ANSWER:
Here is a tuck stitch pattern from the SINGER MEMO II Instruction Book.
Please note that there are two switch symbols outlined in Red and Green that you must pay attention to when programming a stitch.
• First and foremost is the Selection Stop switch, outlined in Red. This switch controls the electronic programmer to either stop the stitch pattern from advancing or to run the stitch pattern as programmed, row-by-row.
• When set to the upper setting which is the triangle symbol, the electronics will begin advancing through the stitch pattern you programmed row-by-row.
• When set to the lower setting which is the small circle symbol, the electronics will stop advancing the stitch pattern. This is where you want to set the Selection Stop Switch when programming any stitch pattern, including Tuck and Slip stitches.
• Once you have programmed your stitch pattern and pressed the Function button for the last time, pattern row 1 will be indicated on the LED display with a small triangle below it, and the machine is instantly ready to commence knitting the stitch pattern.
• When you are ready to work your Tuck Stitch, you then slide this switch upward to the slanted triangle symbol.
NOTE: After completing row 1, the Cursor will hit one of the Cursor Stops and send an instant signal to the electronics to advance to the next row in the stitch pattern, and this new row pattern signal is sent through the Cursor to the magnets under the carriage to select the needles for this next row.
• The next crucial step during programming your stitch pattern is to have the "REVERSER" Switch at the correct setting for Tuck Stitch.
This next photo shows the setting on your model's electronic programmer. Other models have this switch too, only in a different location (see examples towards the end of this post).
This Reverser setting, when knitting a single colour textured stitch technique like Tuck and Slip Stitch results in that all the blank pattern squares will be worked in Stocking Stitch. Any square that is filled in will cause those stitches or needles to Tuck or Slip. So ensure the Reverser is moved upward before beginning to knit.
When the Reverser is set properly and when you have set the appropriate Stitch Size and Bed Space settings, your machine should form both Single Bed Tuck Stitches on the back needle bed . . .
 |
| All images and text copyright Patrick Madden/Superba Knitting™. All rights reserved. |
NOTE ABOUT THE REVERSER SETTING:
Some stitch techniques use both the upper and lower setting of the Reverser switch to achieve different stitch effects. This includes Single Bed Fair Isle and Weave Effect stitches. Below is a sample of two stitches worked in Weave Effect from the Pressure Pad model instruction book. Note that pattern A has the Reverser switch in the lower position, and pattern B has the Reverser in the upper position. You must be diligent in verifying the settings are correct before working your first row and the machine should knit the design properly.
 |
Here are some photos of the various programme cards for three electronic models of SUPERBA that I used to create this simple Tuck Lace Stitch.
This SUPERBA Tuck Lace is worked on an "every other" needle set up on the Back Bed only, and the programme cards are filled in on every other square and the height of the dark squares is two rows, meaning the machine will tuck for two rows then shift to the alternate needles and tuck for two more rows, creating these lacy diamond stitches which look very pretty in a hand dyed yarn. The stitch pattern setting is 4 stitches wide x 4 rows high. The yarn is PRISM Lace Wool®.
• To achieve this using the 16 stitch x 16 row Pressure Pad model machines, here is my hand drawn programme card for my Pressure Pad model, which includes a crude drawing of the Reverser switch and it's position, to remind myself of the correct setting, which is easy to overlook.
• Here is the same stitch pattern for the electronic Light Scanning Selection Box models . . .
• Here is the same stitch pattern for owners of the System 624 pressure pad model machines . . .
This makes for a very nice, open lace style stitch done using the Tuck setting on your SUPERBA.
ALSO NOTE:
For those of you with Double Bed model SUPERBA knitting machines, you have to adjust the Bed Space setting when working textured stitches like Tuck, Slip or Weave Effect to allow these bulkier, textured stitches to slip down between both needle beds. This adjustment should also be done for knitting thicker yarns in Stocking Stitch and double bed rib stitches.
I hope you find this information helpful and this solves the problem of the machine not forming the Tuck stitches properly.
See you again soon and happy knitting.
Patrick Madden.
Toronto, Ontario CANADA
www. superbaknitting.com